


Battery Selection
Transmitter Battery
Installation
Battery Condition
Turning your Transmitter On & Off
How to Set Frequencies
on your Transmitter
How to Access & Use the Function Menu
on your Transmitter
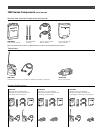
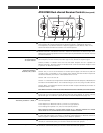
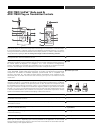
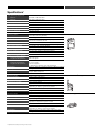
POWER
MUTE
SET
ATW-T1801 UHF TRANSMITTER
POWER/MUTE
SET
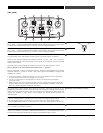
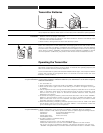
Transmitter Batteries
Each transmitter uses two 1.5V AA batteries, not included. Alkaline type is recommended.
Always replace both batteries. Make certain the transmitter power is Off before replacing batteries.
1. Open the battery compartment door by sliding the catch down (on body-pack) or pushing in
direction of arrow (on plug-on transmitter).
2. Observe correct polarity as marked on the metal contacts on the door and carefully insert
two fresh 1.5V AA alkaline batteries.
3. Close the door, making certain the latch clicks securely in place.
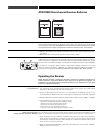
After the batteries are installed, turn the power on by pressing and holding the Power/Mute
button. The small power-on LED (seeaat left ) should light green and the LCD window should
come on. If this does not happen, the batteries are installed incorrectly or they are depleted.
The transmitter’s “fuel gauge” battery indicator in the LCD displays a maximum of four bar seg-
ments. When it flashes “LOW.BAT”, the batteries should be replaced immediately to ensure
continued operation. (Additionally, the power-on LED will flash when the batteries are low.)
Operating the Transmitter
To turn the transmitter on, press and hold the Power/Mute button until the power indicator
lights green, and the LCD window comes on (about 1-2 seconds). The operating frequency will
show in the window after the power-up sequence.
To turn the transmitter off, press and hold the Power/Mute button again, until the power indicator
and the LCD window are extinguished (about 1-2 seconds). The LCD window will show
“PWR.OFF” before shutdown.
NOTE: Transmitter-Receiver pairs must be set to identical frequencies: set Transmitter
1 to the same frequency as Receiver Channel 1; set Transmitter 2 to the same frequency
as Receiver Channel 2.
1. Turn transmitter on.
2. Press the Set button once and the small word “MENU” will appear above the frequency.
3. Press the Set button again and the small flashing word “EDIT” will appear to the right
of “MENU”.
4. Use the Up/Down arrows to change the transmitter frequency. Press either arrow for 25 kHz
steps, or hold down either arrow for rapid cycling through the range. Frequencies “wrap
around” when the top or bottom of the band is reached. Select the exact frequency
displayed on the receiver.
5. To activate this frequency selection, press and hold the Set button until the word “STORED”
appears in the transmitter’s window. (If you do not wish to complete this selection, just
press the Set button once: the word “ESCAPE” will appear briefly in the window and the
transmitter will return to the Menu mode.)
6. When finished entering a frequency, press the Up arrow once to move to “QUIT”. Then press
the Set button once to exit the menu. The word “MENU” in the transmitter window will
go off, indicating the return to normal operation.
1. Turn transmitter on.
2. Press the Set button once; the small word “MENU” will appear above the frequency.
3. When in the Menu mode, use the Up and Down arrows to cycle through the following functions:
• Frequency • Input Select (body-pack only)
• RF Power • Reset to Defaults
• Audio Input Level • Quit (exit menu)
• Power/Mute Locks
4. To make a change in the default setting:
• Press Set button once;
• Press Up or Down arrow until you reach desired setting;
• Press and hold Set button until the word “STORED” appears in the LCD window.
• (If you do not wish to complete this selection, just press the Set button once: the word
“ESCAPE” will appear briefly in the window and the transmitter will return to the Menu mode.)
12
a
ATW-T1801 ATW-T1802