


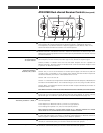
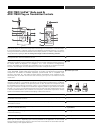
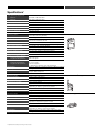

Antenna
Power-on LED
LCD
Audio Input Jack
Microphone Input
Power/Mute Button
Up/Down Arrows
Set Button
Sliding Control Cover
(3-position)
Sliding Control Cover
Battery Door
Mounting Clip
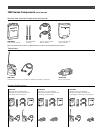
AT W -T1801 UniPak
™
Body-pack &
AT W -T
1802 Plug-on Transmitter Controls
The ATW-T1801 UniPak
™
body-pack transmitter includes a field-replaceable flexible antenna. For
best results, allow the antenna to hang freely and full length from the bottom of the transmitter.
If the received signal is marginal, experiment with different transmitter positions or try reposi-
tioning the receiver. Since the transmitter antenna simply screws in, check to make certain it is
snugly attached (finger-tight). Do not change the length of the transmitting antenna.
Green light indicates power is on and un-muted; red light indicates that audio is muted.
The light will blink when the batteries are low.
Liquid Crystal Display presents setup and operating information. The LCD in the transmitters is
designed for greatest contrast and best viewing with the window rotated somewhat away from
the viewer (about 30 degrees), not straight-on, for a more convenient holding/viewing
position. The display is illuminated with a backlight when you press Set to access transmitter
functions. The backlight will automatically turn off within a set period of time.
Connect an audio input device (microphone or guitar cable) to the audio input jack on the bottom
of the ATW-T1801 UniPak
™
Body-pack Transmitter. A number of Audio-Technica professional
microphones and cables are available separately, pre-terminated with a compatible input
connector (see page 14). The cable connector latches automatically when inserted into the
transmitter jack. To unlatch and remove the connector, pull up on the connector’s knurled
metal collar.
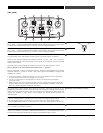
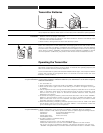
The ATW-T1802 plug-on transmitter has a 3-pin XLRF-type input connector with a locking collar.
Use either a dynamic or a condenser microphone. The transmitter provides power to condenser
microphones rated to operate on 12V phantom power or less. To attach the microphone, rotate
the threaded locking collar fully clockwise (“down”) until it reaches the transmitter housing (see
a at right). Press the microphone and transmitter together (see b at right). Rotate the thread-
ed collar “up” until it is firmly against the end of the mic (see c at right). Make certain the mic
is securely attached before use. To detach the microphone, reverse the steps above. Always
loosen the threaded collar fully before attempting to disconnect the mic.
For on/off and mute functions.
Press Up or Down arrows, in conjunction with the Set button, to choose operating frequencies
and access transmitter functions.
Use in conjunction with the Up/Down arrows, to choose operating frequencies and access
transmitter functions.
This 3-position sliding cover on the body-pack transmitter’s control panel prevents accidental
shut-off or channel-switching.
This sliding cover on the plug-on transmitter’s control panel helps to prevent accidental shut-off
or channel-switching.
Open by sliding the catch down (on body-pack) or pushing in direction of arrow (on plug-on transmitter).
The ATW-T1801 UniPak
™
transmitter’s mounting clip may be installed with the case positioned
either “up” or “down,” depending upon which is preferred for the application. To turn the clip
around, spring the ends of the clip out of the two holes on the sides of the transmitter case and
reinstall it facing in the opposite direction.
11
POWER/MUTE
SET
POWER
MUTE
SET
ATW-T1801 UHF TRANSMITTER
1
2
3
4
5
6
7
8
9
10
11
12
6
2
4
5
6
2
3
3
1
7
7
8
8
9
10
11
11
12
a
b
c