


ATON AH66T INSTALLATION MANUAL
© ATON 2010 | All rights reserved. Page 10
Chapter 2: AH66T System Design Overview
Introduction
The first step to a good design is to map the system. It is advisable to mark up a copy of
the house floor plan with speaker, touchpad, volume control, and equipment locations etc.
Make sure that all locations are decided upon before pre-wiring commences so that all
necessary wiring and installation hardware is in place. This unit will be interfacing with
other components such as amplifiers, source components, communications controllers,
serial controllers, and user interfaces, so it is essential that ALL system components are
accounted for prior to the pre-wire stage.
Secondly, make a detailed list of all components. Include source equipment, touchpads,
volume controls, amplifiers, communications gear and the AH66T itself. Be sure to include
necessary electrical boxes, structured wiring enclosures, telephone lines, rough-in
brackets, patch cords, power supplies, etc.
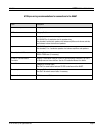
Rack Mounting
Use the ELAN RMK3 Rack-Mount Kit when installing the AH66T in an equipment rack. The
RMK3 is designed to facilitate mounting ATON dual rack-space integrated Multi-Room
Controllers into standard 19” equipment racks in order to provide optimum air flow and
heat dispersion for these units. The RMK3 will take up three rack spaces when installed.
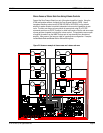
Pre-Wire
This section explains the specifics of pre-wiring for an AH66T system. Care should be
taken at this stage to ensure a properly operational system.
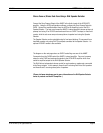
Most system wiring is “home-run” from the device being installed (a touchpad, for
example) back to the equipment location.