


18
ENGLISH
If the clock display flashes
If the display flashes when the clock is displayed, it indicates
that the clock has stopped due to a power failure or the removal
of the power cord. The current time needs to be reset.
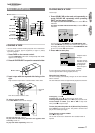
SETTING THE TIMER PLAYBACK
AND TIMER RECORDING
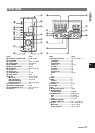
ENTER/ILLUMINATION
TIMER
POWER
SHIFT
POWER
SLEEP
VOLUME/
MULTI JOG
JOG MODE
FUNCTION
TUNER/BAND
TUNER/BAND,
AUX,CD,TAPE
ENTER/
ILLUMINATION
The unit can be turned on at a specified time every day with the
built-in timer.
First, make sure the clock is set correctly.
1
Select the source.
Use FUNCTION on the main unit or one of the function buttons
(TUNER/BAND, AUX, CD or TAPE) on the remote control to
select the source for timer playback or timer recording.
2
Select timer playback or timer recording.
Press JOG MODE repeatedly until "TIMER" appears on the
display, and within 6 seconds, turn VOLUME/MULTI JOG to
select timer playback or timer recording.
When using the remote control, press TIMER repeatedly while
pressing SHIFT.
3
Within 6 seconds, press ENTER/ILLUMINATION.
When using the remote control, press ENTER/ILLUMINATION
while pressing SHIFT.
Time and source display flash alternately.
4
Set the timer-on time.
Tur n VOLUME/MULTI JOG to the right to advance the time
and to the left to move the time back. The speed with which
the time changes varies according to how fast you turn
VOLUME/MULTI JOG. You can also use f or g. Holding
these buttons down will vary the time in 10-minute units.
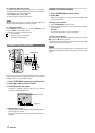
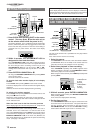
CLOCK AND TIMER
SETTING THE CLOCK
ENTER/ILLUMINATION
SHIFT
CLOCK
f,g
a
a
VOLUME/
MULTI JOG
ENTER/
ILLUMINATION
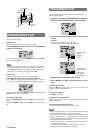
1
Press CLOCK while pressing SHIFT on the remote
control. (You may press a on the main unit or
on the remote control while the power is off.)
The clock is displayed. (The ":" between the hours and minutes
flashes.) When the power code is plugged into an AC outlet
for the first time after purchase or when the clock setting is
canceled due to a power failure, the entire clock display
flashes.
2
Within 4 seconds, turn VOLUME/MULTI JOG to
designate the hour and the minute.
Turn VOLUME/MULTI JOG to the right to advance the time
and to the left to move the time back. The speed with which
the time changes varies according to how fast you turn
VOLUME/MULTI JOG. You can also press f or g.
Holding these buttons down will vary the time in 10-minute
units.
3
Press ENTER/ILLUMINATION or a.
You may press ENTER/ILLUMINATION while pressing SHIFT
on the remote control.
The clock starts form 00 seconds.
To view the clock when another display is in the display
window
Press CLOCK while pressing SHIFT on the remote control.
The time is displayed for 4 seconds and then the original display
reappears.
However, the clock cannot be displayed during recording.
To switch to the 24-hour standard
Press CLOCK while pressing SHIFT on the remote control, and
then press s within 4 seconds.
Repeat the same procedure to restore the 12-hour standard.
In the 12-hour standard, "AM 12:00" indicates midnight and "PM
12:00" indicates noon.
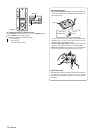
When the clock is set for the first time after purchase
All the display lights turn off when the power is off. (Only the red
indicator lights up.)
This is because the power economizing mode of the unit is
activated, and is not a malfunction. To view the clock in this
case, press CLOCK while pressing SHIFT on the remote control
so that the time is displayed for 4 seconds. (Alternatively, press
ENTER/ILLUMINATION or a on the main unit.) Besides, the
time will be displayed if you deactivate the power economizing
mode. (See page 7 for details.)
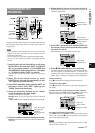
"TIMER5PLAY"
for timer
playback
"TIMER5REC"
for timer
recording