


Installation Manual
XMD076A
XMD076A-3 Information is subject to the 14
Rev C, 06/22/06 restrictions on the title page
H E A D S U P T E C H N O L O G I E S
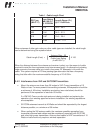
3.2.2 Power System and Initial Test
1. Apply power to the XMD076A receiver and any other system applicable to the MFD
or audio equipment. Some installations may include a WX Data power switch and if
equipped, toggle to the ON position. The receiver is equipped with an on-board red
LED indicator to show the receiver is powered-on.
XM WX: The MFD operations manual may be required to continue.
2. Power up the MFD. Go into Maintenance Mode using the procedure in the MFD
installation manual and select the RS232 port to which the XM Receiver is wired.
3. Restart the MFD. Select the Trip page on the MFD. Press the Display button until
Broadcast (a down pointing arrow) Status is displayed in the Display button label.
4. The MFD should report the “XM Serial Number” matching the “Satellite Weather ID”
code noted in Section 2.2 above. The MFD should also show the Signal Quality of
the XMD076A. If this data is shown on the MFD, the communication link between the
MFD and receiver is operational.
5. If the Signal Quality is reported as “Good”, the antenna and cabling are installed
correctly and are operating normally and, the aircraft is in view of at least one of the
XM satellites.
Note: The “Satellite Weather ID”
code must presented to the aircraft owner, who will
need it to acquire the subscription service and for other customer service needs with
XM Satellite Radio.
6. If the Signal Quality is reported as “Marginal”, “Weak”, or “None”, reposition the
aircraft away from obstructions to get a better view to the sky. After verification of the
aircraft position and if the Signal Quality is still not “Good”, inspect the antenna and
cable.
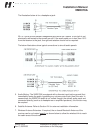
7. If the information is not reported, check the following:
• The software configuration of the MFD. Verify the MFD is configured for use
with the XMD076A (or XMD076). Refer to the MFD documentation.
• The RS232 data wiring to the MFD. Refer to Appendix C and Section 2.3.3
for wiring information.
• Power to the XM receiver. Verify red power indicator (located next to J1) on
the XM receiver is illuminated.
XM Audio: The XMC050 operations manual may be required to continue.
8. Power up the XMC050 controller and set the “Receiver ID” as required. If the
“Receiver ID” is not known, put XMC050 controller in search mode as follows: