


User's Manual
37
Video, Software and Control Menus
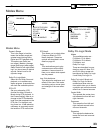
MAIN MENU
TRIMS
MODES
TONE
INPUTS
SETTINGS
SETTINGS
MAIN ZONE
ZONE 2
SPEAKERS
VIDEO
SOFTWARE
CONTROL
AMPLIFIER
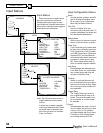
SOFTWARE
UPGRADE SOFTWARE
REVISION LIST
CONTROL
RS-232 ENABLE
REAR MAIN IR ENABLE
REAR ZONE 2 IR ENABLE
FRONT PANEL IR ENABLE
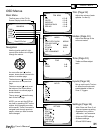
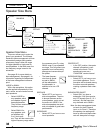
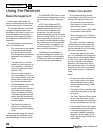
Software Menu
This menu is used to show the cur-
rent revision levels of system software
within your Ultimate Receiver.
It also allows the Flash memory
software to be upgraded by CD, see
page 48 for details.
Control Menu
In most cases, there is no need to
change these settings (all enabled by
default). You should make any chang-
es with caution.
This menu allows you to enable or
disable the RS-232 port and the rear
panel IR remote control connections.
The front panel IR receiver can also
be disabled if required, but make sure
the rear panel IR receiver is working
correctly and is still active before do-
ing this.
The front panel IR can be re-en-
abled by holding down the remote's
MENU button for several seconds,
while pointing it at the front IR window.
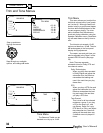
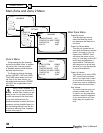
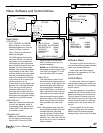
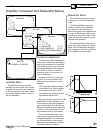
Video Menu
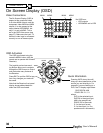
OSD POP UP
(VOL, SOURCE, and MODE)
When enabled, an on-screen
message appears any time the
Volume (or Mute, on-the-ß y-
Trims), Source, and Surround
Mode are changed.
The OSD popups can be set to
show only Volume, only Source,
only Mode, or any combination
of the three, by setting the menu
item to Enable. When all three are
disabled, the Info button is also
disabled, and a message appears
on the bottom of this menu. With
all three disabled, the video signal
uses the purest path possible to
route to the monitor. For example,
if you are set to an S-video input
and the monitor is on it’s
S-video feed, then the video is not
digitized in the Ultimate Receiver.
If you are up-converting from a
composite video source, or you
have pop-ups enabled, then the
video path for S-video will always
be digitized for smoothest viewing
transitions for the OSD popups.
VIDEO DEFAULT
Select the video output where the
"pop-up" text appears, either S
or composite video, but not both.
The full OSD is not affected, as it
is available on both.
VID2/MON2 OUT
VID2: the VCR2/MON2 outputs
can be used for recording to a
second VCR. There is no OSD,
and the output is muted when
VID2 is chosen as an input (to
prevent feedback).
MON2: the VCR2/MON2 output
becomes a second monitor output
(with OSD) for another TV. It will
not mute when VID2 is chosen.
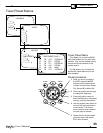
VIDEO DELAY
This adjustment is useful if you
have an external video processor
in your system. Video signals may
become delayed with respect to
the audio signals. Although it is
called Video Delay, it is actually a
delay adjustment of the audio sig-
nals relative to the video signals.
Use the remote's joystick pad to
adjust the delay in one millisecond
steps. An equal amount of delay
time is added to all audio chan-
nels.
Note: The speakers keep their rela-
tive time delay settings which the
Ultimate Receiver calculates
from the Speaker Position Menu
settings. The video delay is just
added on top. Leave the video de-
lay at zero if you have no external
video processor.
VIDEO MENU
OSD VOL POP UP ENABLE
OSD SOURCE POP UP ENABLE
OSD MODE POP UP ENABLE
VID DEFAULT COMP
VID2/MON2 OUT VID2
VID DELAY 0 MS
INFO DISPLAY ENABLED
CHAPTER 4