11
only by the ac 'wiggles' at the output. By
measuring the noise at different frequencies, the
frequency dependence of the noise density can be
found. This usually has the form of v
noise
~
1/f.
The noise computation assumes that the noise
has a Gaussian distribution (such as Johnson
noise). Since the computation takes many time
constants (reciprocal bandwidth), the noise output
should be allowed to approach a steady value
before a reading is taken. For the 1 Hz ENBW,
this time is on the order of 15 to 30 seconds; for
the 10 Hz ENBW, the output stabilizes much
faster. The noise output will vary slightly since
there will always be noise variations that are slow
compared to the bandwidth. Any DC component
in the output will not contribute to the noise.
However, a large DC output will cause the noise
computation to initially rise to a large value before
approaching the final answer. As a result, the
computation will take longer to settle.
To obtain a value for the noise density, the noise
reading should be divided by the square root of
the ENBW. Thus, when the ENBW is 1 Hz, the
noise output is the noise density, and when the
ENBW is 10 Hz, the noise density is the noise
output divided by √10. For example, if the input
noise is measured to be 7 nV with the ENBW set
to 1 Hz, the noise density is 7 nV/√Hz. Switching
the ENBW to 10 Hz results in a faster
measurement and a reading of 22 nV on the
output. The noise density is 22 nV/√10 Hz or 7
nV/√Hz. At frequencies
»
10 Hz, the noise
density should be independent of the ENBW.
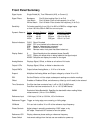
Reference and Trigger Level
The REFERENCE INPUT BNC is located in this
section. The input is ac coupled and the
impedance is 1 MΩ. The dc voltage at this input
should not exceed 100 V and the largest ac signal
should be less than 10 V peak. The three
indicators above the input BNC display the
TRIGGER MODE. The single key above the input
BNC is used to select the TRIGGER MODE.
If the center TRIGGER MODE LED is on, the
mode is SYMMETRIC and the reference oscillator
will lock to the positive zero crossings of the ac
reference input. The ac signal must be symmetric
(e.g. sine wave, square wave, etc.) and have a
peak to peak amplitude greater than 100 mV. A
signal with 1 Vrms amplitude is recommended.
The phase accuracy of the reference channel is
specified for a 1Vrms sinewave in the symmetric
trigger mode.
If the upper TRIGGER MODE LED is on, the
mode is POSITIVE. The trigger threshold is +1V
and the reference oscillator will lock to the positive
going transitions of the reference input. This
mode triggers on the rising edges of a TTL type
pulse train. The pulse width must be greater than
1 µS.
If the lower TRIGGER MODE LED is on, the mode
is NEGATIVE. The trigger threshold is -1V and
the reference oscillator will lock to the negative
going transitions of the reference input. This
mode triggers on a negative pulse train or on the
falling edges of a TTL type pulse train
(remembering that the input is ac coupled). The
pulse width must be greater than 1 µS.
Above the TRIGGER MODE indicators are the
REFERENCE MODE LED's. The key below the
REFERENCE MODE indicators toggles between f
and 2f. When the MODE is f, the lock-in will
detect signals at the reference input frequency.
When the MODE is 2f, the lock-in detects signals
at twice the reference input frequency. In either
case, the reference oscillator has a maximum
frequency of 100 KHz, thus, when in the 2f mode,
the reference input frequency may not exceed 50
KHz.
The REFERENCE DIGITAL DISPLAY shows
either the reference oscillator frequency or
phaseshift. The displayed parameter toggles
between the two whenever the SELECT key is
pressed. The appropriate scale indicator below
the display will be on. It is useful to check the
frequency display to verify that the lock-in has
correctly locked to your reference. The reference
frequency is measured to 1 part in 256 resolution.
Phase Controls
The phase shift between the reference oscillator
and the reference input is set using the four keys
in the PHASE section. The two keys below the
FINE label increment the phase setting in small
amounts. A single key press will change the
phase by 0.025 degrees in the desired direction.
Holding the key down will continue to change the
phase with larger and larger steps with the largest
step being 10 degrees. The two 90° keys are
used to change the phase by 90 degree
increments. The upper key will add 90 degrees
and the lower key will subtract 90 degrees.
Holding both keys down at once sets the phase
shift back to zero. The REFERENCE DIGITAL
DISPLAY automatically displays the phase


