


36
US
D:\NORM'S JOB\SONY HA\SO120031\STR-DA1800ES_PMRF
02\4428194122_USFR\US04GET_STR-DA1800ES-CEL.fm
masterpage: Left
STR-DA1800ES
4-428-194-12(2)
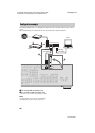
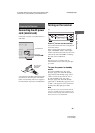
• A digital audio signals transmitted by HDMI
can be output from the speakers connected to
the receiver. This signal supports Dolby
Digital, DTS, and Linear PCM. For details,
see “Digital audio formats supported by the
receiver” (page 21).
• The receiver can receive Multi Channel
Linear PCM (up to 8 channels) with a
sampling frequency of 192 kHz or less with
an HDMI connection.
• Analog video signals input to the receiver’s
VIDEO jack or COMPONENT VIDEO
jacks can be output as HDMI signals
(page 20). Audio signals are not output from
an HDMI OUT jack while the image is
converted.
• This receiver supports High Bitrate Audio
(DTS-HD Master Audio, Dolby TrueHD),
Deep Color (Deep Colour), x.v.Color
(x.v.Colour), 4K and 3D transmission.
• To enjoy 3D images, connect 3D-compatible
TV and video equipment (Blu-ray Disc
player, Blu-ray Disc recorder, PlayStation 3,
etc.) to the receiver using High Speed HDMI
cables, put on 3D glasses, and then play back
a 3D-compatible content.
• To enjoy 4K images, connect 4K-compatible
TV and video equipment (Blu-ray Disc
player, Blu-ray Disc recorder, etc.) to the
receiver using High Speed HDMI cables, and
then play back a 4K-compatible content.
• HDMI IN 4, IN 6 supports 4K transmission.
• HDMI IN 1, IN 2, IN 3, IN 4 can be shown in
preview window.
Notes on HDMI connections
• The audio and video signals of HDMI input
are not output from the HDMI OUT jack
while the GUI menu is displayed.
• DSD signals of Super Audio CD are not
input and output.
• Depending on the TV or the video
equipment, 3D images may not be
displayed. Check the 3D image formats
supported by the receiver (page 134).
• Refer to the operating instructions of each
connected equipment for details.
• Use a High Speed HDMI cable. If you use a
Standard HDMI cable, 1080p, Deep Color
(Deep Colour) or 4K or 3D images may not
be displayed properly.
• We do not recommend using an HDMI-DVI
conversion cable. When you connect an
HDMI-DVI conversion cable to a DVI-D
equipment, the sound and/or the image may
be lost. Connect a separate audio cords or
digital connecting cords, then set the “Input
Assign” in the Input Option menu (page 92)
when the sound is not output correctly.
• When connecting optical digital cords, insert
the plugs straight until they click into place.
• Do not bend or tie optical digital cords.
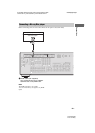
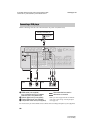
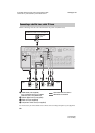
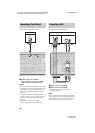
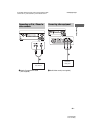
HDMI features
When connecting cords