


4
GB
Getting StartedGetting Started
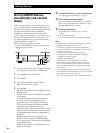
Unpacking
Check that you received the following items with the
tuner:
• Audio cord (1)
• AM loop aerial (1)
• FM wire aerial (1)
• DAB wire aerial (1)
• Remote commander (1)
• R6 (size AA) batteries (2)
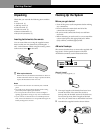
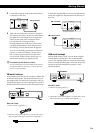
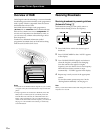
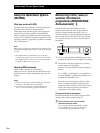
Inserting batteries into the remote
You can control this unit using the supplied remote.
Insert two R6 (size AA) batteries by matching the +
and – on the batteries. When using the remote, point it
at the remote sensor
on this unit.
z When replace batteries
With normal use, the batteries should last for about six
months. When the remote no longer operates the tuner,
replace all the batteries with new ones.
Notes
• Do not leave the remote in an extremely hot or humid
place.
• Do not drop any foreign object into the remote casing,
particularly when replacing the batteries.
• Do not expose the remote sensor to direct sunlight or
lighting apparatuses. Doing so may cause a malfunction.
• If you will not use the remote for an extended period of
time, remove the batteries to avoid possible damage from
battery leakage and corrosion.
AM ANTENNA
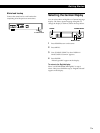
Hooking Up the System
Before you get started
• Turn off the power to all components before making
any connections.
• Do not connect the mains lead until all of the
connections are completed.
• Be sure to make connections firmly to avoid hum
and noise.
• When connecting an audio cord, be sure to match the
colour-coded pins to the appropriate jacks: White
(left) to White; and Red (right) to Red.
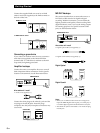
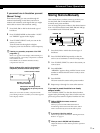
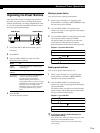
AM aerial hookups
This section describes how to connect the supplied AM
loop aerial. For the specific location of the AM
ANTENNA terminals, see the illustration below.
What will I need?
• AM loop aerial (supplied) (1)
1 Unwrap 2 lengths of the braided lead wire from
around the frame of the aerial. Be careful to
unwrap only the braided section of the lead wire.
Do not unwrap more than 2 lengths of the lead
wire. Also, be careful not to unbraid the lead wire.
2 Assemble the supplied aerial as shown below.