


19
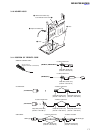
MZ-NH700/NHF800
Example of Calculation:
Item No. Parameter
Result
Decimal Hexadecimal
0211 Pr_nominal 2.50 mW 50 32h
0212 Kr −0.3 %/°C30 1Eh
0213 Pw_nominal 7.35 mW 147 93h
0214 Kw −0.4 %/°C40 28h
0215 Prmin 1.9 mW 38 26h
0216 Pwmin 5.8 mW 116 74h
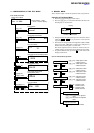
Procedure:
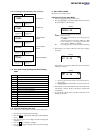
1. In the test mode (Display Check mode), press the [VOL+] key
to enter the Manual mode.
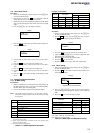
2. Press the > key once, press the [VOL+] key once, and press
the > key once again to display as follows.
Display
3. Press the > key once to select the item number 0211.
4. Adjust with [VOL+]/[VOL--] keys so that the adjustment value
of LCD becomes calculated value.
5. Press the X key to write the adjusted value.
6. Press the > key to next item.
7. Repeat adjustment from step 4 until item number 0216.
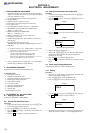
3-7-2. Other setting
1. In the test mode (Display Check mode), press the [VOL+] key
to enter the Manual mode.
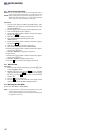
2. Press the > key five time to select the item number 0113
and display as follows.
Display
3. Press the [VOL+]/[VOL--] key and set the according value to
each model type and destination referring to the following
table.
4. Press the X key to write the adjusted value.
Destination
Model Type
MZ-NH700 MZ-NHF800
US − 50
Canadian, Australian 20 30
AEP, UK, East European A0 B0
E18, Hong Kong, Korean,
25 34
Chinese, Tourist
E91, Mexican 20 −
• Abbreviation
E18: 100V - 240V AC area in E model
E91: 220V AC area in E model
Table 3-7-2. Mode Type and Destination Setting
210
DiscPr
113
###S**
adjustment value (hexadecimal)
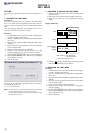
3-6. Laser Power Check
Procedure:
1. In the test mode (Display Check mode), press the [VOL+] key
to enter the Manual mode.
2. Open the lid and press the . key continuously until the
optical pick-up moves to the most inward track.
3. Set the laser power meter so that the laser beam from the optical
pick-up aims at the objective lens of laser power meter at right
angle.
4. Press the [VOL--] key once to display as follows.
Display
5. Press the > key three times to select the item number 9111
and display as follows.
Display
6. Confirm that the value of laser power meter is 0.67 mW ±
21%.
7. Press the > key to select the item number 9112.
8. Confirm that the value of laser power meter is 0.76 mW ±
18%.
9. Press the > key to select the item number 9113.
10. Confirm that the value of laser power meter is 6.25 mW ±
12%.
11. Press the x key four times and back to the Display Check
mode.
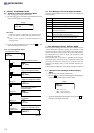
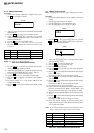
3-7. Setting The Adjustment Values
3-7-1. Hi-MD3 setting
Preparation:
1. Perform calculation every item based on the data given by the
Hi-MD3 adjustment disc by referring to the following table.
(Round off the value in decimal place)
2. Convert the calculated value into hexadecimal number.
Note: The Hi-MD3 adjustment parameters vary depending on the disc,
and therefore use the parameters of the disc used when performing
the adjustment.
Item No. Calculating formula (*3)
0211 Pr_nominal / 0.05
(*1) Por / 0.05
0212 Kr × (−100)
0213 Pw_nominal / 0.05
(*2) Ppw / 0.05
0214 Kw × (−100)
0215 Prmin / 0.05
0216 Pwmin / 0.05
*1) If the “Pr_nominal” value is indicated, use the “Pr_nominal” value
and not used “Por” value.
*2) If the “Pw_nominal” value is indicated, use the “Pw_nominal” value
and not used “Ppw” value.
*3) Round off after the decimal point.
Table 3-7-1. Hi-MD3 adjustment parameter
9
DESIGN
111
###S**
Ver 1.1