


15
MZ-E10
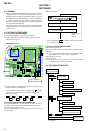
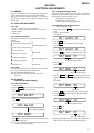
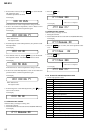
5-5-5.Current Amplifier (L) adjustment method
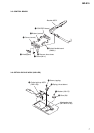
1. Connect TP953 to TP959 on the main board.
2. Set the test mode.
3. Set the Manual mode and set the item No. to 752.
LCD display
752 ChgI L XX
4. Press key to write the adjustment value.
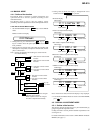
5-5-6. Adjustment value change method 2
(when using Version 1.000)
1. Set in Manual mode and then set item number 026.
LCD display
026 NvWrt CC
2. Press the key.
LCD display
026 8200 **
This section (address) flashes.
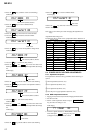
3. Press the key (100th place) and the
VOL +
key (10th
place) and set 828A in the flashing address section.
LCD display
026 828A **
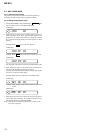
4. Press the
x
key.
LCD display
026 828A **
This section (data) flashes.
5. Press the
VOL +
and
VOL –
keys and set 00 in the flashing
data section.
LCD display
026 828A 00
6. Press the key.
7. Press the
key to return to Manual mode.
LCD display
026 NvWrt CC
8. Press the key and write in the adjustment setting.
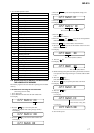
5-6. TEMPERATURE ADJUSTMENT
[Temperature adjustment method]
1. Set in Test mode.
2. Set in Manual mode and set the item number 014.
LCD display
014 AdjTmp XX
Adjustment settingItem No.
3. Measure the temperature.
4. Adjust with the remote control
VOL +
and
VOL –
keys so
that the temperature value is at room temperature.
Reset value: 19h = 25
C
Adjustment range: 80h to 7Fh = -128
C
to +127
C
5. Press the key and write in the adjustment value.
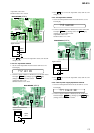
5-7. OVERALL ADJUSTMENT MODE
5-7-1. Overall adjustment mode structure
TEST MODE
(Display Check Mode)
Overall Adjustment
Title Display(ASSY**)
CD overall
Adjustment
.
key
VOL — key
key
x
MO overall
Adjustment
>
key
>
key
key
x
NV Initialize
key two times
key
x
key
x
Power Supply
Adjustment
P.MODE/F key
Note: The overall adjustments should be always performed in the
sequence of CD t MO adjustments.
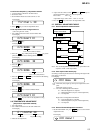
5-7-2. Total Adjust mode title display
Switching to Total Adjust Mode sets the following All Adjust mode
title display on the LCD.
LCD display
000 Assy **
: Disk mark (outer) lights up when power adjustment is com-
plete.
Disk mark (inner) not used
** : Left side is MO alignment information
F* : MO total alignment is complete
1* : Manual alignment (not part of total adjustment)
0* : Not adjusted
Right side is CD alignment information
F* : CD total alignment is complete
1* : Manual alignment (not part of total adjustment)
0* : Not adjusted
5-7-3. Overall CD and MO adjustment method
1. Set the TEST MODE and press
VOL –
key to set the Overall
Adjustment mode.
LCD display
000 Assy11