


10
MZ-E300
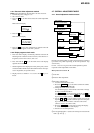
5 Rewriting of the adjustment value.
1.After CD overall adjustment, switch to manual mode No. 321
in the condition the disc is in.
2.Press – key on the remote control unit to set 1 step down the
adjustment value of No. 321, and press the pause key on the
remote control unit to write this value to NV.
3.Press the >B key on the remote control unit to switch to
manual mode No. 323.
4.Press the pause key on the remote control unit to set to the
automatic adjustment.
During adjusting automatically, the adjustment value turns on
and off, so wait for the time the adjustment value is on.
5.Press the >B key on the remote control unit to switch to
manual mode No. 345.
6.Note down the current adjustment value of No. 345 (value X).
Use the + and – keys on the remote control unit to set the
adjustment value of No. 345 to the value (Y) determined by
the formula below, and press the pause key on the remote
control unit to write this value to NV.
Formula: X x 1.18 = Y
* Since X and Y are 2’sC, attention must be paid to codes.
And the maximum value of Y must be 7Fh. (Never set it to
the negative value.)
Example: Since X = 2Bh, Y = 2Bh x 1.18 = 33h
6 Change the disc to MO overall adjustment disc (GA1 disc).
Switch to manual mode No.114.
Press the pause key on the remotecontrol unit to set to the
automatic adjustment.
After adjustment, pull out the battery from the set to turn off
the power.
Then insert the battery again.
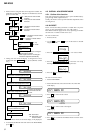
7 MO overall adjustment.
Microprocessor Version 1.20 and higher
1 Clear NV.
2 Electric offset adjustment.
3 CD overall adjustment.
4 Rewriting of the adjustment value.
1.After CD overall adjustment, switch to manual mode No. 321
in the condition the disc is in.
2.Press – key on the remote control unit to set 1 step down the
adjustment value of No. 321, and press the pause key on the
remote control unit to write this value to NV.
3.Press the >B key on the remote control unit to switch to
manual mode No. 323.
4.Press the pause key on the remote control unit to set to the
automatic adjustment.
During adjusting automatically, the adjustment value turns on
and off, so wait for the time the adjustment value is on.
5.Press the >B key on the remote control unit to switch to
manual mode No. 345.
6.Note down the current adjustment value of No. 345 (value X).
Use the + and – keys on the remote control unit to set the
adjustment value of No. 345 to the value (Y) determined by
the formula below, and press the pause key on the remote
control unit to write this value to NV.
Formula: X x 1.18 = Y
* Since X and Y are 2’sC, attention must be paid to codes.
And the maximum value of Y must be 7Fh. (Never set it to
the negative value.)
Example: Since X = 2Bh, Y = 2Bh x 1.18 = 33h
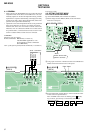
4-7-2. Overall CD and MO adjustment method
1. Set the TEST MODE and press VOL – key or . key to set
the Overall Adjustment mode.
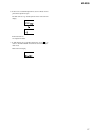
Main unit LCD display
2. Insert CD disc in the set, and press . key to set the Overall
CD Adjustment mode.
Automatic adjustments are made.
Main unit LCD display
XXX: Item No. for which an adjustment is being executed.
YY: Adjustment Value
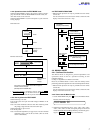
3. If NG in the overall CD adjustments, return to Reset NV and
perform from the electrical offset adjustment again.
The NG item and “ng” alternately flash on the main unit LCD
display.
XXX: NG item No.
YY: Adjustment Value
4. If OK through the overall CD adjustments, then perform overall
MO adjustments.
Main unit LCD display
5. Insert MO disc in the set, and press > N key to set the
Overall MO Adjustment mode. Automatic adjustments are made.
Main unit LCD display
XXX: Item No. for which an adjustment is being executed.
YY: Adjustment Value
XXX:
ASS
XXX:
n
End:cd
XXX:
5 Change the disc to MO overall adjustment disc (GA1 disc).
Switch to manual mode No.114.
Press the pause key on the remotecontrol unit to set to the
automatic adjustment.
After adjustment, pull out the battery from the set to turn off
the power.
Then insert the battery again.
6 MO overall adjustment.
Ver 1.1 2001.03