


GB
13
2
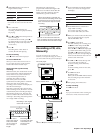
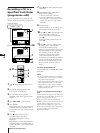
Press FUNCTION repeatedly until the
source you want to record appears in
the display.
Source
CD
Radio
MD, etc.
3 Slide DIRECTION to select dual or
single-sided recording.
To record on one side, set to A.
To record on both sides, set to a.
4 When you want to reduce the hiss noise
in low-level high-frequency signals,
slide DOLBY NR to ON.
5 Press r REC on the deck.
The deck stands by for recording, and
the r REC button lamp and the P
button lamp on the deck light up.
Either the ( or 9 button lamp lights
up, and the other flashes and goes out.
If the ( or 9 button lamp does not
light up or frash, the corresponding tab
on the cassette has been removed. You
cannot record on this side.
6 Press ( or 9 to select the tape side
you want to start recording on.
To start recording on the front side,
press (.
To start recording on the reverse side,
press 9.
7 Press P on the deck.
Recording starts.
When you set the DIRECTION switch to
a, recording stops at the end of the
reverse side.
8 Start playing the sound source.
To stop recording
Press p on the deck.
Note
If you press FUNCTION while recording, the
sound source will be switched to another.
When the track order has been
programmed and the total length of the
tracks to be recorded is shorter than the
length of one side of the tape, the unit
automatically operates as follows:
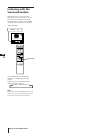
Recording a CD, etc.,
Manually
You can record a CD as you like, for
instance, record just the songs you want, or
you can record from any point on the tape.
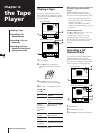
1 Press 6 EJECT and insert a blank tape.
Chapter 4: the Tape Player
4 Slide DIRECTION to select dual or
single-sided recording.
To record on
One side
Both sides*
* Recording always stops at the end of the
reverse side. Be sure to start from the front
side.
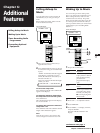
5 Press CD SYNC.
The cassette deck stands by for
recording, and the CD player stands by
for playing.
6 Press ( or 9 to select the tape side to
start recording on.
To start from the front side, press (.
To start from the reverse side, press 9.
(Recording will be made only on the
reverse side.)
7 Press P.
Recording starts. After about 10
seconds, the CD starts playing.
To stop recording
Press p on the deck or the CD player.
To activate DOLBY NR
When you want to reduce the hiss noise in
low-level high-frequency signals, slide the
DOLBY NR switch to ON after step 4.
About CD SYNC (synchronized)
recording
With this feature, the cassette deck records
a CD synchronizing with the length of the
tracks on the CD, so you do not have to
worry about the tape direction or
remaining time while recording.
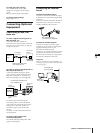
This stereo system uses the Fade
Synchronized recording feature. With this
feature, the deck slowly fades out a
recording so that a track is not abruptly cut
off at the end of the tape.
If the tape reaches the end of its front side
while recording a track, the deck re-records
it automatically after rewinding the tape to
the beginning of the track. This time, the
track is recorded with a fadeout at the end
of the tape. (Recording ends at this point if
it is a single-sided recording.)
Slide DIRECTION to
A
a
Front side
Reverse side
Recording starts
from the track that
was faded out at
the end of the
front side.
The track at the
end of the reverse
side is also faded
out if it does not
fit in the tape
length.
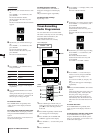
Recording in the original
track order of the CD
1 2 3 4 5
9
8 7 6
Reverse side
Front side
Once all of the selected tracks have
been recorded, the deck records about
four seconds of silence and then stops.
When the CD player is paused, the
deck continues recording silence until
it reaches the end of the front side;
then it reverses the tape and starts
recording.
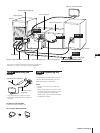
Indication
CD
TUNER
MD
Tuner CD player
1
Stereo cassette deck
POWER → ON
p
7
5
3
4
6
2
6