


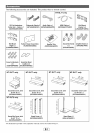
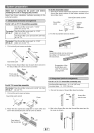
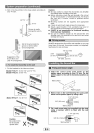
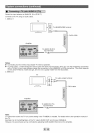


3.SlotintheSoundBartothebasestandaccordingto
yourTVsize.
60"TV{_
_ _J} 70 II TV
__N_ Groove to neatly
_ the wire in.
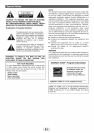
Caution:
• Be very careful to prevent the Sound Bar and Amplifier
from falling when mounting on the wall.
• Before mounting, check the wall strength. (Do not put
on the veneer plaster or whitewashed wall. The Sound
Bar may fall.) If unsure, consult a qualified service
technician.
• Mounting screws are not supplied. Use appropriate
ones.
• Check all wall mount angle screws for looseness.
• Select a good location. If not, accidents may occur or
the Sound Bar and Amplifier may get damaged.
• SHARP is not responsible for accidents resulting
from improper installation.
• Do not let children dangle on the Sound Bar and
Amplifier once it is attached on the wall as it can cause
damage and injury.
Slot in the wire inside the
groove or slit for better
wire arrangement.
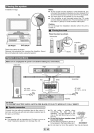
Suggestion of the
Sound Bars and
LCD TV arrangement.
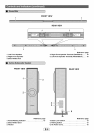
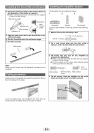
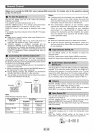
1. Fix the brackets to the holes as shown.
Model HT-SL77 :for 52", 60" and 70" TV)
Model HT-SL72 :for 60" TV)
Model HT-SL77 : for 46" TV)
Caution:
Be careful not to
fix the bracket V
/%upside down.
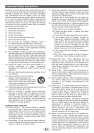
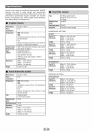
SHARP designed the Sound Bar and Amplifier so you may
hang them on the wall. Use proper screws (not supplied).
See below for size and type.
1/8" (3.2 mm)
3/16" _
(5 mm) _ 3/8" (9 mm)
7/8" (Min. 22 mm)
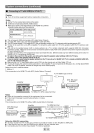
m
1 Select the correct screw point marks on the
pattern paper according to your TV size. Fix the
pattern paper to the wall in horizontal position as
below.
Wall surface
Pattern paper
2 Make a hole on the wall following the screw point
marks on the pattern paper by using a drill.
1-1/4" (32 mm)
3/8" (8-9 mm) _<_
Wall surface l
3 Fix a wall mount plug (not supplied) into the hole
using a hammer, until it is flush with the wall
surface.
1-1/4" (32 mm)
3/8/89mm)wa,! eI