..,.~........ ... - -
51 P2
54 P2
51
54
(
+
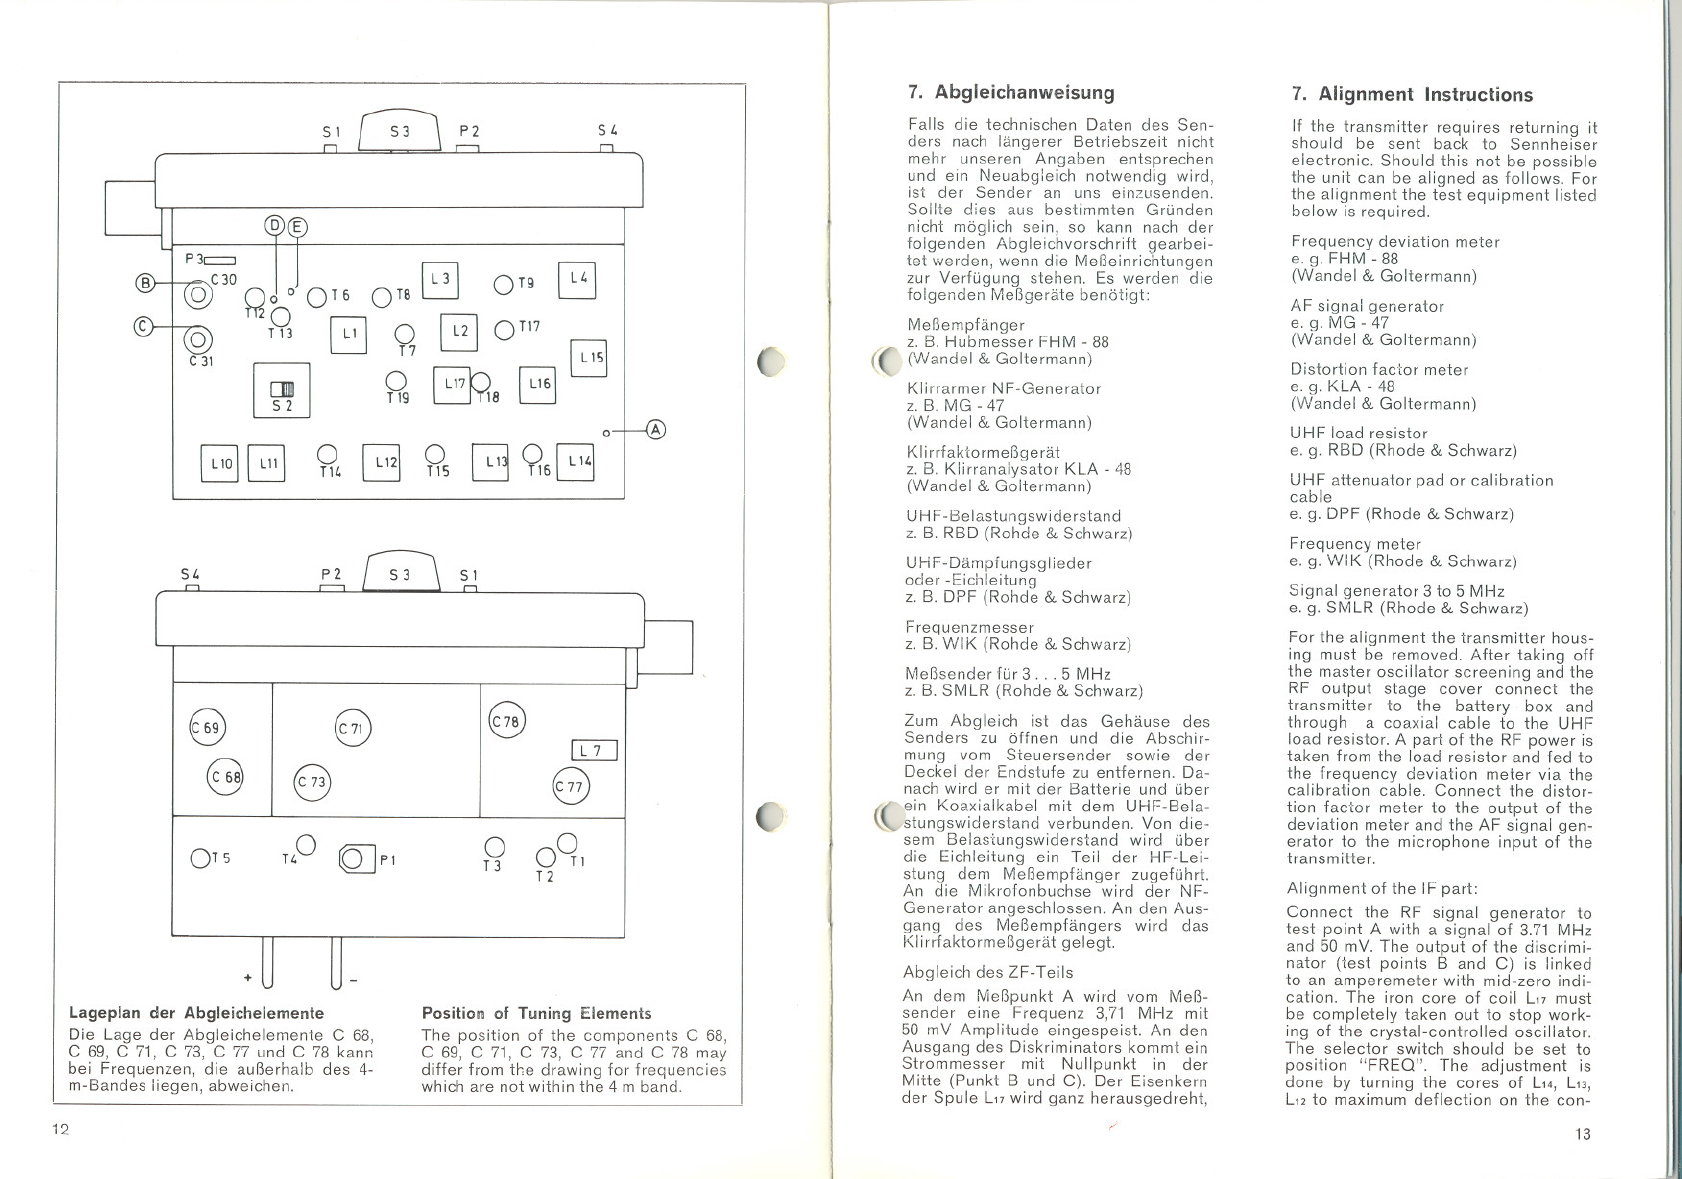
Lageplan der Abgleichelemente
Die Lage der Abgleichelemente C 68,
C 69, C 71, C 73, C 77 und C 78 kann
bei Frequenzen, die außerhalb des 4-
m-Bandes liegen, abweichen.
Position of Tuning Elements
The position of the components C 68,
C 69, C 71, C 73, C 77 and C 78 may
differ from the drawing for frequencies
which are not within the 4 m band.
12
7. Abgleichanweisung
Falls die technischen Daten des Sen-
ders nach längerer Betriebszeit nicht
mehr unseren Angaben entsprechen
und ein Neuabgleich notwendig wird,
ist der Sender an uns einzusenden.
Sollte dies aus bestimmten Gründen
nicht möglich sein, so kann nach der
folgenden Abgleichvorschrift gearbei-
tet werden, wenn die Meßeinrichtungen
zur Verfügung stehen. Es werden die
folgenden Meßgeräte benötigt:
Meßempfänger
z. B. Hubmesser FHM - 88
ce (Wandel & Goltermann)
Klirrarmer NF-Generator
z. B. MG - 47
(Wandel & Goltermann)
Klirrfaktormeßgerät
z. B. Klirranalysator KLA - 48
(Wandel & Goltermann)
UHF-Belastu ngswiderstand
z. B. RBD (Rohde & Schwarz)
UHF-Dämpfungsg lieder
oder -Eichleitung
z. B. DPF (Rohde & Schwarz)
Frequenzmesser
z. B. WIK (Rohde & Schwarz)
Meßsender für 3. . .5 MHz
z. B. SMLR (Rohde & Schwarz)
Zum Abgleich ist das Gehäuse des
Senders zu öffnen und die Abschir-
mung vom Steuersender sowie der
Deckel der Endstufe zu entfernen. Da-
nach wird er mit der Batterie und über
{("'"ein Koaxialkabel mit dem UHF-Bela-
~stungswiderstand verbunden. Von die-
sem Belas'cungswiderstand wird über
die Eichleitung ein Teil der HF-Lei-
stung dem Meßempfänger zugeführt.
An die Mikrofonbuchse wird der NF-
Generator angeschlossen. An den Aus-
gang des Meßempfängers wird das
Klirrfaktormeßgerät gelegt.
Abgleich des ZF-Teils
An dem Meßpunkt A wird vom Meß-
sender eine Frequenz 3,71 MHz mit
50 mV Amplitude eingespeist. An den
Ausgang des Diskriminators kommt ein
Strommesser mit Nullpunkt in der
Mitte (Punkt Bund C). Der Eisenkern
der Spule L17wird ganz herausgedreht,
7. Alignment Instructions
If the transmitter requires returning it
should be sent back to Senn heiser
electronic. Should this not be possible
the unit can be aligned as foliows. For
the alignment the test equipment listed
below is required.
Frequency deviation meter
e. g. FHM - 88
(Wandel & Goltermann)
AF signal generator
e. g. MG - 47
(Wandel & Goltermann)
Distortion factor meter
e. g. KLA - 48
(Wandel & Goltermann)
UHF load resistor
e. g. RSD (Rhode & Schwarz)
UHF attenuator pad or calibration
cable
e. g. DPF (Rhode & Schwarz)
Frequency meter
e. g. WIK (Rhode & Schwarz)
Signal generator 3 to 5 MHz
e. g. SMLR (Rhode & Schwarz)
For the alignment the transmitter hous-
ing must be removed. After taking off
the master oscillator screening and the
RF output stage cover connect the
transmitter to the battery box and
through a coaxial cable to the UHF
load resistor. Apart of the RF power is
taken from the load resistor and fed to
the frequency deviation meter via the
calibration cable. Connect the distor-
tion factor meter to the output of the
deviation meter and the AF signal gen-
erator to the microphone input of the
transmitter.
Alignment of the IF part:
Connect the RF signal generator to
test point A with a signal of 3.71 MHz
and 50 mV. The output of the discrimi-
nator (test points Band C) is linked
to an amperemeter with mid-zero indi-
cation. The iron core of coil L17must
be completely taken out to stop work-
ing of the crystal-controlled oscillator.
The selector switch should be set to
position "FREQ". The adjustment is
done by turning the cores of L14,L13,
L'2 to maximum deflection on the con-
13
OT9
ß
0
om
T7
B
0
G
T19
18
01-6:
BB
0
B
0
ß6G
T14 T1S
G
G
G
ITIJ
8
8
G
I
:0
HO
0
0
OTS
QJPl
0 TI
T3
T2


