


Installation
40 Signature Cinema™ SC-50d/SC-60d Installation/Operation Manual
PRE
L
IMINAR
Y
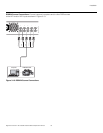
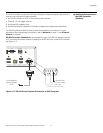
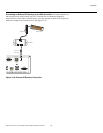
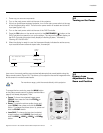
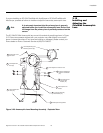
Ethernet Network Connection: Use a standard, Category 5 network cable with an
RJ-45 plug to connect a network hub, router or gateway to the Ethernet port on the DHD
Controller; see Figure 3-20. For more information about configuring and using this
connection, refer to Network on page 71.
Figure 3-20. Ethernet Network Connection to DHD Controller
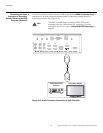
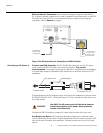
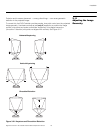
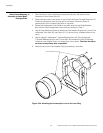
Connecting to AC Power Projector and DHD Controller: The SC-50d/SC-60d ships with two (2), AC power
cords: one for the DHD Controller and one for the projector. They are not
interchangeable. The projector power cord is rated at 15 amps and has a ferrite sleeve,
to reduce radio frequency interference (RFI) emissions to a level that conforms to FCC
regulations:
Plug the female end of the projector power cord into the AC receptacle on the rear of the
SC-50d/SC-60d (AC 100V ~ 240V); see Figure 2-2. Then, connect the other end to your
AC power source.
Connect the DHD Controller to a nearby AC outlet using the other AC power cord.
AutoScope Lens Motor: With AutoScope-equipped projectors, an additional power
cord is provided for the lens motor. Plug the female end of the AC power cord into the AC
input on the rear of the lens motor assembly. Connect the other end to your AC power
source.
To Accessory Box
IR
Display Control
HDMI 3
HDMI 4
Ethernet
HDMI Out
To Display
HDMI Out
Audio Only
RS-232
T
o
A
ccessor
y
B
o
x
IR
Display
Control
HDMI
3
H
DMI
4
HDMI Out
To
Dis
p
l
a
y
H
DMI
Ou
t
Audio Only
RS
-23
2
1
8
to Ethernet
Hub, Router
or Gateway
1 Transmit Data +
2 Transmit Data -
3 Receive Data +
6 Receive Data -
➤
Use ONLY the AC power cord with the ferrite sleeve to
connect the projector to AC power. Doing otherwise
creates a fire hazard risk.
Ferrite sleeveAC power cord
To power outlet
To Projector AC IN
WARNING