


24
RSX-972 Surround Sound Receiver
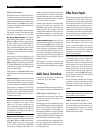
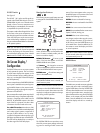
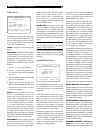
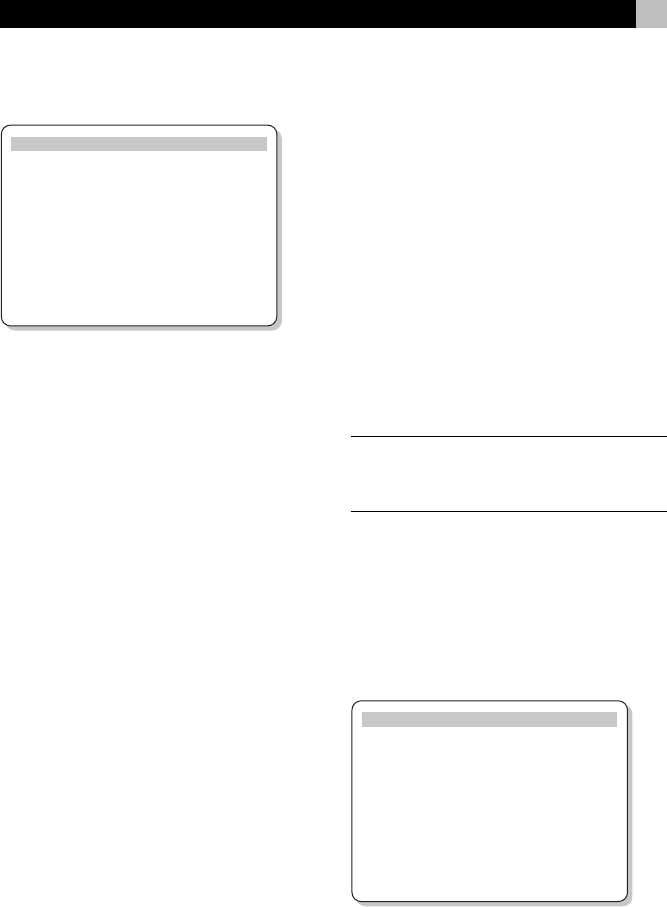
INPUT Menu
INPUT SETUP
LISTEN: Video 2
INPUT LABEL: _ _ _ _ _
INPUT: Coaxial 1
INPUT MODE: Dolby 3 Stereo
DIGITAL OUT: Coaxial 1
ENT KEY=MAIN MENU UP KEY=up
+/– KEY=change DWN KEY=down
The INPUT menu configures the source inputs
and is reached from the MAIN menu. The
screen provides the following options, selected
by placing the highlight on the desired line
using the UP/DOWN buttons:
LISTEN: changes the current listening input
source
INPUT LABEL: The labels for the five VIDEO
inputs can customized. This is not available
for the TUNER, CD, and TAPE inputs. Place
the highlight on this line to call up a sub-menu
that allows you to change the five-character
label for the current VIDEO source. To change
the label:
1. Press the +/– keys to begin labeling.
2. Press the +/– keys to change the first let-
ter, scrolling through the list of available
characters.
3. Press the ENT key to confirm that letter and
move to the next position.
4. Repeat steps 2 and 3 until all five charac-
ters have been completed. The final press
of the ENT button will save the new label
and exit the sub-menu.
INPUT: selects which physical input connec-
tion to use as the default for the source dis-
played in the first line of the menu. The op-
tions include the ANALOG inputs, the two
OPTICAL digital inputs (OPTICAL 1& 2), and
the three COAXIAL digital inputs (COAXIAL
1 – 3). When a digital input is configured in
this menu, the unit will check for a digital sig-
nal each time that input source button is pressed.
If no digital signal is present, the unit will au-
tomatically revert to the analog input. This digital
auto-sensing is the preferred configuration for
digital source inputs such as DVD players.
INPUT MODE: selects the default surround
sound mode for the input shown at the top of
the menu. The default setting can be overrid-
den at any time with the front-panel MODE
buttons. Options include: DTS, Dolby Digital,
Dolby Pro Logic, Dolby 3-Stereo, Music 1,
Music 2, Music 3, Music 4, and Dolby Digi-
tal 2-ch Stereo. This is a default setting and
can be manually overridden by the front-panel
switches MODE switches.
DIGITAL OUT: selects which digital input
signal is available for recording at the digital
output connectors. It is a global setting: the
selected digital input will always be available
at the digital outputs, regardless of which source
is selected for listening. The same signal will
be available at both the coaxial and optical
outputs.
NOTE
: We suggest that you return to this menu
after connecting each source component to
properly configure that source.
To return to the MAIN menu, press the ENTER
button. Press the MENU key on the remote to
cancel the menu display and return to normal
operation.
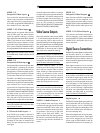
SPEAKER SETUP Menu
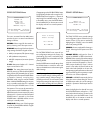
SPEAKER SETUP
FRONT: Large
CENTER: Large
SURROUND: Large
SUBWOOFER: Yes
ENT KEY=MAIN MENU UP KEY=up
+/– KEY=change DWN KEY=down
The SPEAKER SETUP menu is used to config-
ure the RSX-972 for use with your specific
loudspeakers. The menu is accessed from the
MAIN menu.
Home theater speaker systems vary in their
size and performance, particularly in bass
output. Surround sound processors feature
steering logic which sends bass information
to the speaker(s) best able to handle it – sub-
woofers and/or large speakers. For optimum
performance, you must tell the RSX-972 what
types of speakers are in your system.
The following configuration instructions refer
to LARGE and SMALL speakers, referring more
to their bass performance than physical size.
A full-range speaker with extended bass re-
sponse is considered LARGE. A compact
speaker with limited bass response or power
handling is considered SMALL.
As a general rule, the system will redirect bass
information away from SMALL speakers and
send it to the LARGE speakers and/or the
SUBWOOFER in your system.
Things become more complex with a sub-
woofer. For example, the system will gener-
ally not redirect bass information away from
a LARGE speaker to the subwoofer. Thus, you
must decide if you want a particular speaker
to play the deep bass or whether the deep
bass should be sent to the subwoofer. If you
have a subwoofer, you might decide to send
all of the bass to it, regardless of how capable
the other speakers in the system may be. In
this case, you would tell the RSX-972 that all
of your speakers are SMALL, without regard
to how big they may actually be.
An alternative configuration for setting up front
SMALL speakers with a subwoofer is to follow
the speaker manufacturer’s instructions, wir-
ing the SMALL speakers to the subwoofer’s
crossover and then connecting the subwoofer
directly to the front speaker connection termi-
nals. In this arrangement, the speakers would
be classified as LARGE and the subwoofer
setting would be OFF for all surround modes.
No information will be lost during playback
because the system knows to redirect the bass
information to the front LARGE speakers. This
configuration may improve the way the bass
integrates into the listening room and ensure
correct satellite speaker operation by using the
speaker manufacturer’s own crossovers.
The following speaker options are available:
FRONT SPEAKERS (small/large): This
menu setting determines what kind of main front
left and right speakers you are using. Use the
LARGE setting if your main left and right speak-
ers are full range designs with good bass
response capability. If you are using minispeak-
ers, use the SMALL setting.
CENTER SPEAKER (small/large/none):
Use the LARGE position (not available with
SMALL front speakers) if your system’s center
channel speaker is capable of full-range, ex-
tended bass response. Use the SMALL posi-
tion if your center channel speaker has more
limited low frequency capability, or if you prefer
that the bass be sent to the subwoofer. Select
the NONE setting if your system does not have
a center channel speaker.
SURROUND SPEAKERS (small/large/
none): If your rear surround speakers are
capable of sustained low frequency output, select