


10
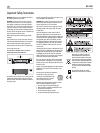
RC-1580 Stereo Control Amplifier
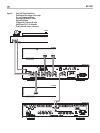
PhonesOutput
0
The Phones output allows you to connect headphones for private
listening. This output accommodates standard
1
/8” stereo mini plugs.
If your headphones have a
1
/4” plug you will need an adapter plug.
Contact your authorized Rotel dealer, to get the correct adapter plug.
Note: Plugging in a set of headphones does not cut off the signal to
the outputs. The power amplifier will continue to receive a signal and
the speakers will continue to play. However, when headphones are
plugged in, the 12V turn-on signal from the number “1” 12V Trigger
Output is cut off. (The number “2” 12V Trigger output remains on.)
So if your system is configured to use the number “1” 12V Trigger
Output to turn the amplifier on and off, plugging in headphones will
automatically turn off the power amplifier.
Media Player Input
-
A 3.5mm (1/8”) stereo input socket for a “Media Player” is provided
on the front of the RC-1580 and is selected by pressing the AUX 3
Listening input buttons.
Any portable stereo cassette, compact disc player or hard disc
playback device can be connected via this input. If the Media Player
input is connected to the headphone outputs of the player note that
you may need to adjust the volume control on the player for sound to
be heard. If the sound is loud and distorted turn down the volume on
the player. If the sound is not loud enough, even when the RC-1580
volume control is turned up fairly high, then carefully turn up the
volume control on the player.
Note: When the 3.5mm (mini jack) is inserted into the Media Player
socket the rear input called AUX3 is disconnected. Removing the
3.5mm plug from the Media player socket will allow the rear AUX3
input to function.
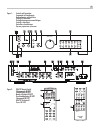
Audio Controls
Volume Controls
7
and
C
The front panel Volume control
7
increases or decreases the volume
in both channels at the same time. Turn it clockwise to increase the
volume or counterclockwise to decrease the volume. On the RR-AT97
remote use the Volume + and – buttons
C
to increase or decrease the
volume level.
Mute Button
E
Remote Only
Push the MUTE button on the remote once to turn the sound off. Press
the button again to restore previous volume levels. The LED in the
volume control will flash when the unit is muted.
Note: Pressing the volume buttons on the remote also cancels the
muting function.
Balance Control
6
The Balance Control adjusts the left-to-right balance of the sound
output. Normally the control should be in the center position. In some
situations, typically when the main listening position is not ideally
centered between the speakers, it may be necessary to adjust the
control to achieve proper left-to-right balance. Turning the control
counter-clockwise shifts the sound balance to the left. Turning the
control clockwise shifts the sound balance to the right.
ToneOn/OffSwitch
4
When the Tone Switch is in the Off (out) position the Bass and Treble
Control circuits are bypassed to ensure the purest possible sound.
Leave the Tone Switch in the Off position unless you want to use the
Tone Controls. Push in the Tone Switch if you want to adjust the Tone
Controls.
Bass and Treble Controls
3
When the Tone Switch is pushed in, turning the Bass and Treble
Controls adjusts the tone balance of the sound. Turn the Controls
clockwise to increase the bass or treble output. Turn the Controls
counterclockwise to decrease the bass or treble output.
A properly set up high-performance audio system produces the most
natural sound with little or no adjustment of the tone controls. Use
these controls sparingly. Be particularly careful when turning the
controls up (clockwise). This increases the power output in the bass or
treble range, increasing the load on the amplifier and speakers.
Listening Selector Buttons
8B
Press one of the Listening Selector Buttons to select the input signals
that goes to the main outputs and to the power amplifier – or, more
simply, which source is heard.
Recording Selector Buttons
9D
Press one of the Recording Selector Buttons to select the input signal that
goes to the record outputs. When you are not recording, press the Off
button. This minimizes the chance of interference from other components
in the system.
Having a separate Recording and Listening selector adds a significant
degree of flexibility in how you can use the RC-1580. For example
by selecting CD with the Record Selector and selecting Tuner with the
Listening Selector you can record a CD onto a tape while listening to
the tuner.
If you have a three-head recorder or a DAT recorder that allows
simultaneous read and write operation, you can monitor your
recording by pressing the TAPE 1 LISTENING button.
Note: The TAPE 2 input is a dedicated Theater By-Pass input. See
the information in the Theater Bypass Mode section on the preceding
page.