


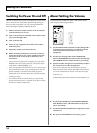

17
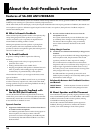
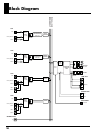
About the Anti-Feedback Function
How to Use Anti-Feedback
Anti-feedback is enabled only for Channels 1 and 2. In addition, the function can be used only when INPUT SELECT is set to MIC.
When Using a Mic Stand
Both the mic characteristics and the characteristics of the
surrounding environment can be compensated for.
1. Set up and connect the SA-300 and the mic.
• Set up the SA-300 and the mic in the positions they will
be used.
• Adjust the height of the mic stand and the angle of the
mic.
• Set the SA-300’s VOLUME knob to the level actually to
be used in performance.
2. Press the ANTI-FEEDBACK ON/OFF button so its
indicator is lit.
3. Hold down the ANTI-FEEDBACK SWEEP button for at
least one second.
The indicator flashes, and the sound of the calibration
signal is output from the speaker.
The calibration signal is set automatically in accordance
with the mic position and volume setting.
* Be aware that the sound output is relatively loud.
When measurement and analysis are finished and the
feedback prevention processing is completed, the
indicator stops flashing and remains lit.
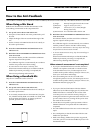
When Using a Handheld Mic
Only the mic conditions can be corrected.
1. Press the ANTI-FEEDBACK ON/OFF button so its
indicator is lit.
2. Set up and connect the SA-300 and the mic.
• Set the SA-300’s VOLUME knob to the level actually to
be used in performance.
• To accurately measure the mic characteristics, keep the
mic, whether held by hand or mounted on a stand, fixed
in the position shown below. To setting up the mic
position, please be careful of feedback.
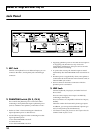
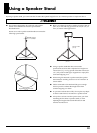
fig.03-10
(1) Angle: Directly facing the front of the SA-300
(2) Distance: Approx. 50 cm (19-11/16”)
(3) Height: 120 cm (47-1/4”) or more (Height
during actual use)
(4)
Mic Direction:
Level and directed at the SA-300
3. Hold down the ANTI-FEEDBACK SWEEP button for at
least one second.
The indicator flashes, and the sound of the calibration
signal is output from the speaker.
The calibration signal is set automatically in accordance
with the position of the mic and the volume setting.
* Take care not to stand between or leave any object obstructing
the space between the mic and the SA-300.
* To increase measurement accuracy, keep the surroundings as
quiet as possible.
When measurement and analysis are finished and the
feedback prevention processing is completed, the
indicator stops flashing and remains lit.
When automatic measurement is not completed
• If you press the SWEEP button to start the calibration
without a microphone connected or with the volume
level turned down too low, SA-300 outputs an error
sound from the speaker and stops analysis. If this occurs,
check your connections and settings.
• If the surrounding noise level is too loud or the
microphone position is too far, SA-300 outputs an error
sound from the speaker and stops analysis. If this occurs,
the SWEEP indicator light goes off.
• If you press the ON/OFF button while the SWEEP
indicator is lit, the indicator light goes off, and the anti-
feedback function is switched off. The results of the
correction process are stored in memory, though, so
turning the function on again returns the function to its
previous status. However, turning off the power clears
the results of the correction.
• SA-300 does not respond to panel operations while in
SWEEP calibration. It responds after the calibration is
completed.
• The anti-feedback function does not work on LINE jack
input.
• The sound quality is altered somewhat while the anti-
feedback is operational.
• With some settings, feedback may not be suppressed,
even after you have run the anti-feedback process with
the SWEEP button.