


10
Names of Things and What They Do
Jack Panel
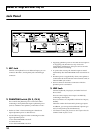
fig.01-02
1. MIC Jack
Connect a microphone here. For balanced input, you can
connect to the TRS 1/4-inch phone jacks and XLR type
connector.
fig.01-03
2. PHANTOM Switch (CH 3, CH 4)
This switches the phantom power on and off. When
connecting a microphone that requires phantom power
(such as condenser microphones), switch this to “ON.”
• Set this to “OFF” when connecting mics that do not
require phantom power or other devices.
• Use the following sequence when connecting mics that
require phantom power:
1. Turn the PHANTOM switch off.
2. Connect the mic.
3. Turn the PHANTOM switch on.
• Supplying phantom power to mics that do not require it
or supplying it to other devices may cause such
equipment to malfunction. Always be sure to turn the
switch off before connecting.
• To protect the circuitry, the channel output is muted
momentarily after the PHANTOM switch is turned on or
off.
• Phantom power is supplied only when a microphone is
connected to the XLR connector in the Channel 3 and/or
Channel 4 MIC jack section.
• Do not connect or disconnect connectors while the
phantom power is turned on.
3. LINE Jack
Connect keyboards, CD players, and other line-level
devices here.
These are stereo inputs; mono input is available by
connecting to the left jack.
These connectors are compatible with line-level input (-
20 dBu).
Channels 3 and 4 also feature RCA phono type inputs.
In addition, you can input to both the RCA phono type
and 1/4-inch phone jacks simultaneously.
* All Channel 4 LINE jacks function as mono inputs when the
STEREO LINK IN jack is in use.