


14
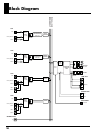
Making the Connections
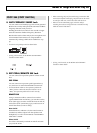
Switching the Power On and Off
Once the connections have been completed, turn on power to
your various devices in the order specified. By turning on
devices in the wrong order, you risk causing malfunction
and/or damage to speakers and other devices.
1. Make sure that all volume controls on the SA-300 and
connected devices are set to 0.
2. Turn on all the devices connected to the SA-300’s input
jacks (CH 1 through CH 4).
3. Turn on the SA-300.
4. Switch on any equipment connected to the SA-300’s
LINE OUT jacks.
5. Adjust the volume levels for the devices.
6. Before switching off the power, lower the volume on
each of the devices in your system and then Turn Off
the devices in the reverse order to which they were
switched on.
* If you need to turn off the power completely, first turn off the
POWER switch, then unplug the power cord from the power
outlet. Refer to “Power Supply” (p. 6).
* This unit is equipped with a protection circuit. A brief interval
(a few seconds) after power up is required before the unit will
operate normally. For protection from sudden big sound,
always make sure to have the volume level turned down before
switching on power.
* Even with the volume all the way down, you may still hear
some sound when the power is switched on, but this is normal,
and does not indicate a malfunction.
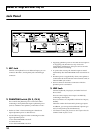
About Setting the Volume
To obtain the best sound from the SA-300, set the volume
level using the following procedure.
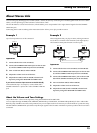
fig.02-04
1. Use the INPUT SELECT buttons for CH 1 through CH 4
to switch the input sensitivity in accordance with the
connected devices (microphones or line-level
equipment).
2. Use the CH 1 through CH 2 VOICE ENHANCER
buttons, REVERB/DELAY knobs and the CH 3 through
CH 4 REBERB knobs to adjust the tone to your liking.
3. Operate the CH 1 through CH 4 volume knobs to adjust
the volume level for CH 1 through CH 4.
* If the sound is distorted (when level indicator 0 dB is lit),
adjust the volume either with the VOLUME knobs (Channels
1–4) or the volume knobs on devices connected to the inputs
(Channels 1–4).
At this point, balance the volume levels of Channels 1–4.
fig.02-051
4. Use the EQUALIZER knobs (LOW/MIDDLE/HIGH),
LOW BOOST button, and WIDE button to adjust the
tone to your liking.
5. Use the MASTER VOLUME knob to adjust the overall
volume level.
6. Set up the ANTI-FEEDBACK if necessary. (p. 16)