


11
Chapter 1: Installation Guide
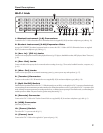
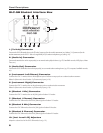
• Connect each student GLC-SB interface box to the corresponding numbered connectors on the GLC-1 Hub using
supplied RJ-45 (8-conductor telephone-type) cables.
• Optional—Connect the audio outputs on the external audio playback device(s) to the [Aux. In] / [CD In] jacks on the
GLC-1 Hub using optional cables.
• Optional—Connect the [Rec. Out] jacks on the GLC-1 Hub to the audio input(s) on the external audio recording device
using optional cables.
• Optional—Connect the [Mon. Out] jacks on the GLC-1 Hub to the audio inputs on the external monitoring system using
optional cables.
Test the Basic System
When all conference system components are placed and the cables are connected, test each component using the following procedure.
Power Up
Note: It’s strongly recommended that you power up the conference components in the following order.
• Student instruments
• Teacher’s instruments
• External audio playback/recording device(s)
• Visual monitors
• Computer(s)
• GLC-1 Hub
• External monitoring (speaker) system
Test the Teacher’s Station
• Simultaneously press the [All] and [STUDENT MUTE] buttons on the GLC-1 conference controller to “clear all”
settings.
• Set the output level on the teacher’s instrument to somewhere between 50%–100%—this provides the best signal-to-noise
audio response.
• Set the [TEACHER MIC] and [TEACHER HEADPHONE] sliders on the GLC-1 Teacher Control Pad to somewhere
between 50%–100%.
• Put on the teacher’s headset and play a few notes on the teacher’s instrument. You should hear what you’re playing.
If you don’t hear anything, check the teacher’s instrument and teacher’s headset connections.
• Press the [TEACHER MIC] button on the GLC-1 conference controller and talk into the teacher’s microphone.
You should hear yourself. If you don’t hear anything, check the teacher’s headset connections.