


Tsunami MP.11a Antenna Installation Guide
Chapter 1. Preparing for Installation
SITE PREREQUISITES
Review all requirements outlined within the following sections before starting the installation procedure:
▪ Overview of the Indoor Installation
▪ Overview of the Outdoor Installation
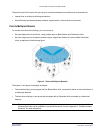
▪ Climbing the Roof
Prior to climbing on the roof or any other area where you intend to install the outdoor antenna, you are
advised to:
▪ Verify that you have arranged all safety measures for outdoor or rooftop installation.
▪ Verify that you have all equipment and tools required to install the outdoor antennas.
▪ Install and verify proper operation of the equipment.
OVERVIEW OF THE INDOOR INSTALLATION
The indoor installation of the link consists of the following components:
▪ The Tsunami MP.11a hardware
▪ A cable system
Tsunami MP.11a Hardware
There are three types of hardware devices to setup a wireless link:
▪ Tsunami MP.11a Base Station Unit (BSU)
▪ Tsunami MP.11a Subscriber Unit (SU)
▪ Tsunami MP.11a Residential Subscriber Unit (RSU)
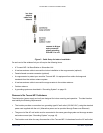
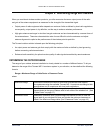
Tsunami MP.11a
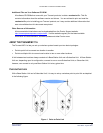
The following figure shows an overview of the cable setup for this outdoor antenna. When the MP.11a is not
mounted close to the entrance of the antenna cable into the building (where the surge arrestor must be
mounted), an additional cable between the MP.11a and the surge arrestor is needed, plus a female-female
converter connector. If the MP.11a is mounted close to the surge arrestor, the MP.11a can be connected
directly to the surge arrestor.
The deviation to the rule is the MP.11a RSU when the Window antenna is installed in an indoor location. This
does not require the use of a Surge Arrestor. The antenna can be connected directly to the MP.11a.
Chapter 1. Preparing for Installation 8
CPN 65756B Issue Date: August 2003