


Tsunami MP.11a Antenna Installation Guide
MOUNTING THE ANTENNA
Proxim Corporation offers multiple antennas to set up a wireless link. As the mounting procedures for the
various antennas differ from one another, consult the documentation you received from the antenna
manufacturer for mounting procedures.
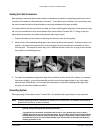
When mounting multiple antennas on a single mast, use the following methods to minimize the influence of
cross-talk interference between the antennas:
▪ Place your antennas as far apart as you can.
▪ Alternate the mounting of directional antennas for vertical and horizontal polarization.
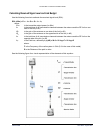
Connecting the Antenna Cable
Once the antenna is properly installed, you can connect the antenna to the Base Station or Subscriber Unit
by way of the surge arrestor:
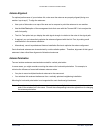
1. Connect the antenna cable to the antenna.
2. Secure the antenna cable to the mast so that the cable connectors do not support the full weight of the
cable.
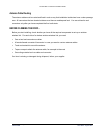
3. Connect the opposite end of the antenna cable to the surge arrestor.
CAUTION! To avoid damage to the antenna cable and connectors, refrain from using tools to tighten the
cable connectors.
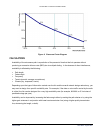
4. Prior to securing the cable along its complete length, run the Link Test diagnostics of the management
tools that comes with Tsunami MP.11a to analyze wireless performance and optimal placement of the
outdoor antenna. How to use this tools is described in the documentation that comes with the Tsunami
MP.11a or can be from the Proxim website at http://www.expressresponse.com/proxim02/
.
5. If required, adjust the direction of the antenna.
6. Once the installation has been fully tested, tighten the nuts of the antenna to “lock” the antenna into its
position.
CAUTION! Avoid over-tightening of the connector, and nuts and screws used to mount the antenna, to
prevent damage to your Tsunami MP.11a hardware.
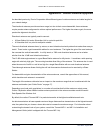
7. Secure the cable along its complete length with cable ties or electrical tape to relieve strain on the
antenna connector properly. No part of the cable should be allowed to hang free. This is especially
important for those parts that are routed outside the building.
8. Proceed as described in the next section to weatherproof all outdoor coax connectors.
Chapter 3. Installing the Antenna 28
CPN 65756B Issue Date: August 2003