


Black plate (4,1)
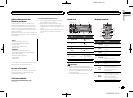
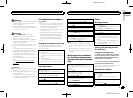
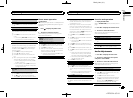
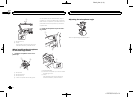
Display indication
4 5
6
3
8
a
c
9
1
2
7
b d
Indicator State
1
Main dis-
play sec-
tion
! Tuner: band and frequency
! Built-in CD, USB storage
device and iPod: elapsed
playback time and textin-
formation
2 c
An upper tier ofthe folder or
menu exists.
3 d
A lower tier ofthe folder or
menu exists.
This flashes when asong/
album related to thesong cur-
rently playing is selectedfrom
the iPod.
4
(list)
The list function isbeing oper-
ated.
5
(artist)
The artist name isdisplayed.
Artist search refinement ofthe
iPod browsingfunction is in
use.
6
(disc)
The disc (album) nameis dis-
played.
Album search refinement of
the iPod browsing function is
in use.
Indicator State
7
(song)
The track (song) nameis dis-
played.
A playable audio filehas been
selected during operation of
the list.
Song search refinement ofthe
iPod browsingfunction is in
use.
8 LOC Local seek tuning ison.
9
(re-
peat)
Track or folder repeatis on.
a
(ran-
dom/shuf-
fle)
Random playis on.
The iPod source isselected
and theshuffle or shuffleall
function ison.
b
(auto
answer)
Shows whenthe automatic an-
swering functionis on.
c
(Blue-
tooth indi-
cator)
Connected toa Bluetooth de-
vice.
d
(sound re-
triever)
The soundretriever function is
on.
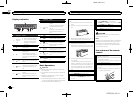
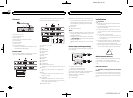
Basic Operations
Important
! Handle gently when removing or attaching
the front panel.
! Avoid subjecting the front panel to excessive
shock.
! Keep the front panel out of directsunlight
and high temperatures.
! To avoid damaging thedevice or vehicle inte-
rior, remove any cables anddevices attached
to the front panel before detaching it.
Removingthe front panel toprotect your unitfrom
theft
1 Press the detachbutton to releasethe front
panel.
2 Push the frontpanel upward andpull it toward
you.
3 Always keep thedetached front panel ina pro-
tection devicesuch as aprotection case.
Re-attaching thefront panel
1 Slide the front panelto the left.
Make sureto insert thetabs on the leftside of
the headunit into theslots on the frontpanel.
2 Press the rightside of thefront panel until itis
firmly seated.
If youcannot attach the frontpanel to the
head unitsuccessfully, makesure that youare
placing thefront panel ontothe head unitcor-
rectly.Forcing thefront panel intoplace may
result indamage to thefront panel orhead
unit.
Turning theunit on
1 Press S(SRC/OFF) toturn the unit on.
Turning theunit off
1 Press andhold S(SRC/OFF) untilthe unit
turns off.
Selecting asource
1 Press S(SRC/OFF) tocycle between:
TUNER (tuner)—CD(built-in CD player)—USB
(USB)/iPod (iPod)—AUX (AUX)
Adjusting thevolume
1 TurnM.C. to adjustthe volume.
CAUTION
For safetyreasons, park your vehicle when re-
moving the front panel.
Note
When this unit’s blue/white lead is connectedto
the vehicle’s auto-antenna relay control termi-
nal, the vehicle’s antenna extends when this
unit’s source is turned on. Toretract the anten-
na, turn the source off.
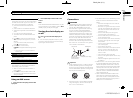
Use and care of the remote
control
Using theremote control
1 Point theremote control inthe direction of the
front panelto operate.
When usingfor the firsttime, pull outthe film
protruding fromthe tray.
Replacingthe battery
1 Slide the tray outon the backof the remote
control.
2 Insert the battery with theplus (+) andminus
(–) polesaligned properly.
Operating this unit
02
4
Section
Operating this unit
En
<YRD5324-A/S>4