


12
English
3139 115 21993
Step 3: Connecting TV
Pb
DIGITAL
OUT
DIGITAL
IN
AUX
IN
TV
IN
LINE
OUT
AUDIO
VIDEO
OUT
CVBS
S-VIDEO
FM ANTENNA
AM
L
R
WOOFER SURROUND CENTER FRONT
L
R
SL
SUB
SR
C
Y
AUDIO
OUT
Pr/Cr
Pb/Cb
Y
S-VIDEO
IN
VIDEO IN
COMPONENT
VIDEO IN
AUDIO
OUT
Pr/Cr
Pb/Cb
Y
S-VIDEO
IN
VIDEO IN
COMPONENT
VIDEO IN
2
1
3
P-SCAN
ON OFF
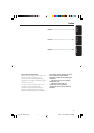
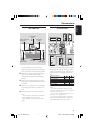
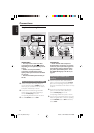
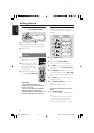
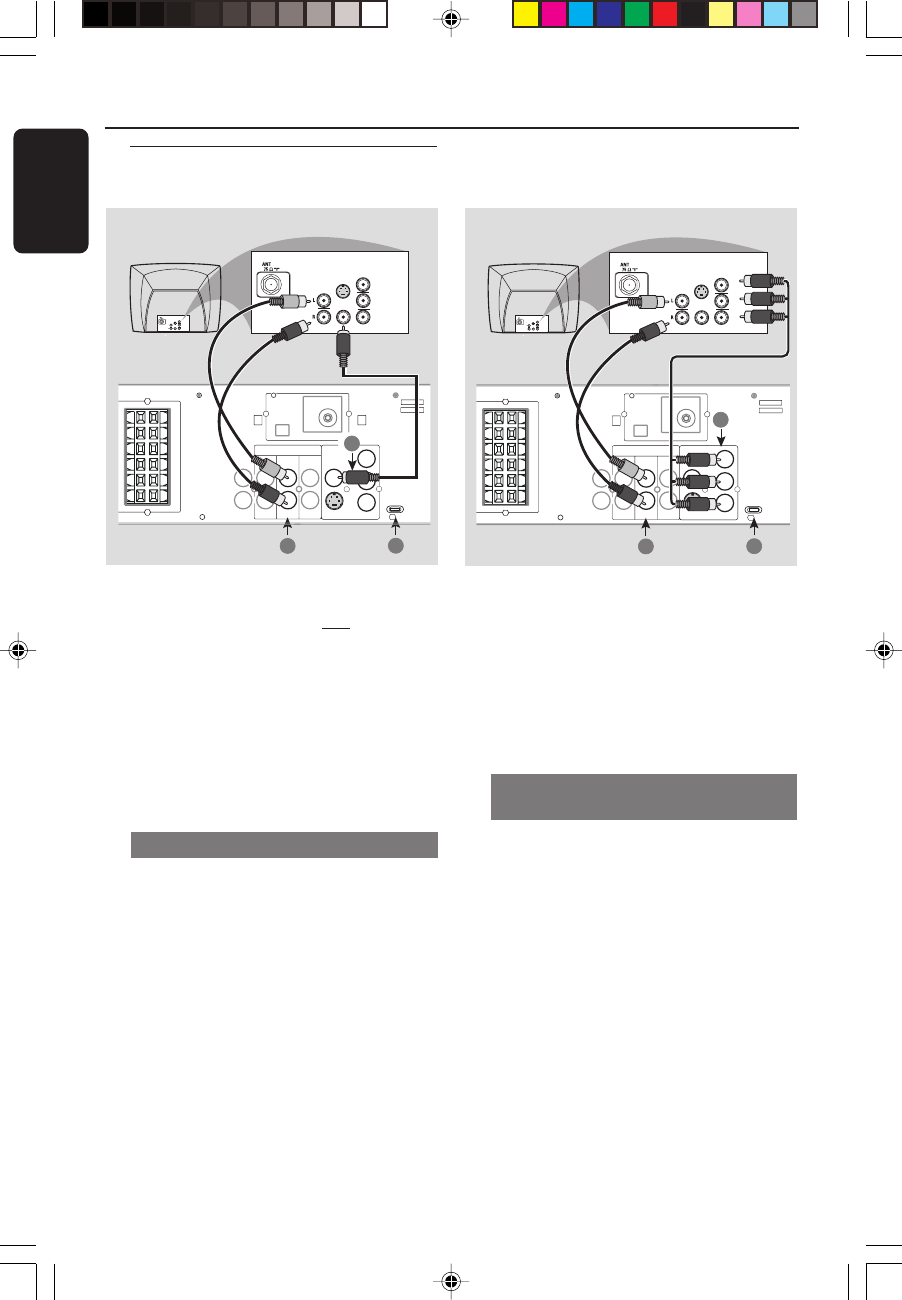
IMPORTANT!
– You only need to make one video
connection from the following options,
depending on the capabilities of your TV
system.
– S-Video or Component Video
connection provides higher picture
quality. These options must be available
on your TV.
– Connect the DVD system directly to
the TV.
Using Composite Video jack (CVBS)
1 Use the composite video cable (yellow) to
connect the DVD system’s CVBS jack to the
video input jack (or labeled as A/V In, Video In,
Composite or Baseband) on the TV.
2 To hear the TV channels through this DVD
system, use the audio cables (white/red) to
connect TV IN (L/R) jacks to the
corresponding AUDIO OUT jacks on the TV.
3 Set the P-SCAN switch to ‘OFF’.
Connections
P-SCAN
ON OFF
Pb
DIGITAL
OUT
DIGITAL
IN
AUX
IN
TV
IN
LINE
OUT
AUDIO
VIDEO
OUT
CVBS
S-VIDEO
FM ANTENNA
AM
L
R
WOOFER SURROUND CENTER FRONT
L
R
SL
SUB
SR
C
Y
AUDIO
OUT
Pr/Cr
Pb/Cb
Y
S-VIDEO
IN
VIDEO IN
COMPONENT
VIDEO IN
AUDIO
OUT
Pr/Cr
Pb/Cb
Y
S-VIDEO
IN
VIDEO IN
COMPONENT
VIDEO IN
2
1
3
Pr
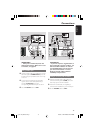
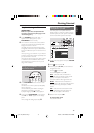
IMPORTANT!
– If both S-Video and Component
(Pr Pb Y) Video connections are used to
connect to your TV, the video signal will
automatically switch to S-Video when
you power up the DVD system. To set
the VIDEO OUT(put) to ‘Pr Pb Y’, see
page 29.
Using Component Video jacks
(Pr Pb Y)
1 Use the component video cables (red/blue/
green) to connect the DVD system’s Pr Pb Y
jacks to the corresponding Component video
input jacks (or labeled as Pr/Cr Pb/Cb Y or YUV)
on the TV.
2 To hear the TV channels through this DVD
system, use the audio cables (white/red) to
connect TV IN (L/R) jacks to the
corresponding AUDIO OUT jacks on the TV.
3 If you are using a Progressive Scan TV (TV must
indicate Progressive Scan or ProScan capability),
set the P-SCAN switch to ‘ON’. Otherwise,
set it to ‘OFF’.
pg 001-044_MX39-37-Eng1 2/25/03, 10:28 AM12