


RQT5997
ENGLISH
RQT5997
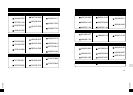
English capitals
)
English lower case
e;
Numerals and symbols
(
Katakana
2
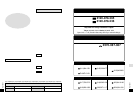
1
Press or swipe [
:
!
,
#
9
] to
move the cursor over the character
you want to enter.
2
Press [ENTER] to enter the
character.
The character you selected is entered.
The cursor moves to the right and shows
where the next character will be entered.
∫
To stop part way through an
editing operation
Press [
∫
, OPR OFF].
The normal display is restored.
∫
To move the cursor
Press [
M
s r
L
VOL/CURSOR].
r
L
: Move to the right
s
M
: Move to the left
∫
Correcting titles
1
Press [
M
s r
L
VOL/CURSOR] to
move the cursor over the character
you want to correct.
2
1
Press or swipe [
:
!
,
#
9
] to
move the cursor over the character
you want to enter.
2
Press [ENTER] to enter the
character.
The new character replaces the old one.
∫
To insert an extra character
1
Press [
M
s r
L
VOL/CURSOR] to
move the cursor over the place you
want the character to go.
2
Press [EQ/REC SENS, SPACE
3
1
Press or swipe [
:
!
,
#
9
] to
select the character to enter.
2
Press [ENTER] to enter the
character.
The character is inserted.
∫
To erase a character
1
Press [
M
s r
L
VOL/CURSOR] to
move the cursor over the character
you want to erase.
2
Press [MODE, DELETE].
The characters after the erased character
move back to take its place.
∫
Changing capitals into lower case
or lower case into capitals
1
Press [
M
s r
L
VOL/CURSOR] to
move the cursor over the character
you want to change.
2
Press [DISP, CAPS].
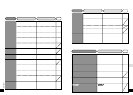
Copying titles from one MD to
another (TITLE STATION)
Refer to the illustration on pages 61 to 62
of the Japanese text.
The unit temporarily records the titles from
an MD so they can then be copied onto
another MD.
Before proceeding
≥
You cannot copy titles from prerecorded
MDs or blank MDs.
≥
You can copy titles only if both MDs have
the same number of tracks.
≥
If the MD you are copying titles to already
has titles, they are replaced with the new
titles when this procedure is used.
≥
Group information is also copied from the
disc being copied.
1
Insert the MD with the titles.
2
Press [EDIT, MARK MODE] while
stopped.
3
1
Press [
:
,
9
] to select “TITLE
COPY?”.
2
Press [ENTER].
After “TITLE MEMORY” is displayed
“TAKEOUT DISC” is displayed when the
unit has recorded the titles.
4
Eject the MD.
“CHANGE DISC” is displayed when the
lid is opened.
5
Insert the other MD.
After “TOC Reading” is displayed, the
display asks you to confirm the operation.
6
Press [EDIT, MARK MODE].
When “UTOC Writing” goes out editing is
complete and the unit stops.
∫
To stop part way through an
editing operation
Press [
∫
, OPR OFF] before confirming the
operation in step 6.
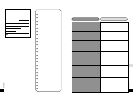
Titling MDs
Titling discs and tracks
Refer to the illustration on page 55 of the
Japanese text.
Each track and disc can have a title of up to
100 characters in length.
1
Press [EDIT, MARK MODE] while
stopped.
“TITLE?” appears on the display.
2
Press [ENTER].
“DISC TITLE?” appears on the display.
3
When titling a disc
When titling a disc
Press [ENTER] again.
The text editing mode is entered.
When titling a track
When titling a track
1
Press or swipe [
:
!
,
#
9
] to
select the track you want to title.
2
Press [ENTER].
The text editing mode is entered.
4
Enter the title. (See below.)
5
Press [EDIT, MARK MODE].
When “UTOC Writing
”
goes out editing is
complete.
∫
After titling a disc
The display automatically shows the track
titling display. Follow the steps for titling
tracks.
∫
To stop part way through an
editing operation
Press [
∫
, OPR OFF] before confirming the
operation in step 5.
Note
≥
If you start entering a title while a track is
playing, the track repeats until you finish.
≥
The number of characters is limited to 97
when the track is recorded with LP2 or
LP4.
≥
If you begin title editing with a disc that has
titles longer than 100 characters, “TITLE
OVER” is displayed and then the text-
editing mode is entered. The unit erases the
extra characters when you complete editing.
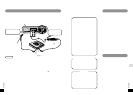
Entering text
Refer to the illustrations on pages 58 to
61 of the Japanese text.
Preparation: Put the unit in the text editing
mode (See above.).
1
Press [
1
;
CHARA to select the
type of characters.
The type changes each time the button is
pressed.
≥
GROUP TITLE
After step 3 on the preceding page
The display is ready for you to select the
group to title.
4
1
Press or swipe [
:
!
,
#
9
] to
select the group you want to title.
2
Press [ENTER].
The text editing mode is entered.
5
Enter the title. (See right.)
6
Press [EDIT, MARK MODE].
When “UTOC Writing” goes out editing is
complete and the unit stops.
∫
To stop part way through an
editing operation
Press [
∫
, OPR OFF] before confirming the
operation in step 6.
≥
GROUP RELEASE
After step 3 in the page before
The display is ready for you to select the
group to release.
4
1
Press or swipe [
:
!
,
#
9
] to
select the group you want to release.
2
Press [ENTER].
The display asks you to confirm your
selection.
5
Press [EDIT, MARK MODE].
When “UTOC Writing” goes out editing is
complete and the unit stops.
∫
To stop part way through an
editing operation
Press [
∫
, OPR OFF] before confirming the
operation in step 5.
Note
≥
After using editing functions (e.g., DIVIDE,
MOVE, and COMBINE) on a disc with
groups, the unit rewrites UTOC to maintain
consistent group information.
≥
If you create groups with this unit and then
perform editing on a unit that is
incompatible with group functions, the
group information may be rendered
unusable.
Operating Instructions
Operating Instructions