


RQT5997
Basic recording
Refer to the illustrations on pages 24 to
28 of the Japanese text.
Preparation
Preparation
≥
Release HOLD.
≥
Insert a recordable MD.
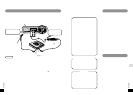
1
Connect this unit to a unit that has a
digital output terminal.
Connect this unit to a unit that has
stereo LINE OUT terminals.
≥
Connect while the unit is stopped.
≥
Do not connect anything to [MIC (PLUG
IN POWER)] when analog recording.
2
Slide [REC
➞
,
LP MODE] to the right.
The unit comes on and enters the
recording standby mode. If you have
inserted an MD with recordings already
on it, the unit prepares to record from the
first available space.
3
1
Press [
1
;
CHARA] to start
recording.
2
Begin playback of the source.
∫
To pause recording
Press [
1
/
;
, CHARA]. (The number of
tracks increases by one.)
Recording restarts when pressed again.
∫
To stop recording
Press [
∫
, OPR OFF].
(UTOC is recorded.)
≥
The unit powers itself off automatically in
about a minute.
≥
You can turn off the unit by pressing again
[
∫
OPR OFF] on the main unit while
stopped.
∫
High quality recording
You can take advantage of the unit’s High
Density Encoding System (HDES) when
using normal stereo mode for recording,
whichever input mode you choose to use;
digital, analog, or microphone. HDES does
not function when you use MDLP modes.
“HDES” appears on the unit’s display when
you put the unit in the recording standby
mode.
∫
To record at the correct volume
Adjust the recording sensitivity to suit the
equipment you have connected. (See page
81.)
Operating Instructions
Operating Instructions
DIGITAL
ANALOG
RQT5997
ENGLISH
∫
To stop recording
Press [
∫
, OPR OFF].
(UTOC is recorded.)
≥
The unit powers itself off automatically in
about a minute.
≥
You can turn off the unit by pressing again
[
∫
OPR OFF] on the main unit while
stopped.
Note
≥
One track synchronized recording does not
function in the following cases:
≥
When you start CD play from track 2 or
later.
≥
When the first track on a CD is not
numbered 1 (on the second of a set of two
CDs, for example).
≥
You cannot pause recording manually
during synchronized and one track
synchronized recording.
≥
You cannot use synchronized recording
when using a microphone.
Putting track marks
Track marks are put automatically as follows.
When recording from a CD or MD
The track marks are put onto the MD
corresponding to the tracks on the other
disc. (Track marks may not correspond to
track numbers with some discs.)
When recording from other digital
sources
5 seconds of silence is determined as the
division between two tracks and a track
mark is added.
2 seconds of silence is determined as the
division between two tracks and a track
mark is added.
∫
Connecting digital equipment
≥
Use an AC adaptor to power a portable CD
player and turn off its anti-skip function.
≥
This unit has a sampling rate converter that
functions automatically, so you can make
digital recordings from equipment with
different sampling rates, such as satellite
receivers and DAT decks.
Synchronizing recording with
the playback equipment
Synchronized recording
This method starts and stops recording at
the same time as the source being recorded.
One track synchronized recording
The first track on a CD is recorded and then
the unit goes to recording standby mode.
This is a convenient mode if you want to
record the first track off a number of single
CDs.
Preparation
Preparation
≥
Release HOLD.
≥
Insert a recordable MD.
1
Connect this unit to other equipment.
2
Slide [REC
➞
,
LP MODE] to the right.
3
Press [MODE, DELETE] to select the
recording mode.
Each time [MODE, DELETE] is pressed
SYNC
>
SYNC 1
>
Normal (No display)
^__________}
SYNC
>
Normal (No display)
^_____}
Note
I
f you have set the recording mode to “SYNC”,
recording begins immediately if the source, for
example the radio, you are recording is already
playing.
4
Begin playback of the source.
Recording begins automatically.
∫
To pause recording
If you have selected
≥
Synchronized recording (SYNC)
This unit automatically pauses if the source
is stopped or if 2 seconds of silence when
analog recording, 5 seconds of silence
when digital recording is detected. (The
number of tracks increases by one.)
≥
One track synchronized recording (SYNC 1)
The unit automatically pauses after the first
track finishes.(The number of tracks
increases by one.)
Recording restarts as follows
≥
Synchronized recording (SYNC)
When sound is input again
≥
One track synchronized recording (SYNC 1)
When you change the CD and play track 1
DIGITAL
ANALOG
DIGITAL
ANALOG
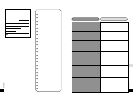
Using the Flatswitch
Refer to the illustrations on page 19 of
the Japanese text.
The flatswitch allows you to efficiently select
track number and enter text.
There are the following four ways of
selecting track number and characters.
1
Press
Skip one track number or character.
2
Swipe
When editing, skip three track numbers
or characters.
3
Press and hold
When editing, skip track numbers and
characters faster.
4
Swipe and hold
When editing, track numbers and
characters are skipped very fast.
When [
#
9
] is pressed or swiped
The track number increases or the
characters change in alphabetical order.
When [
:
!
] is pressed or swiped
The track number decreases or the
characters change in reverse alphabetical
order.
Before recording
Track marks
Like CDs, it is possible to select and play a
track on an MD by selecting its track
number. There are marks at the beginning of
each track, called track marks, that make
this possible. The period between each track
mark is called a track.
(See “Ways of adding track marks” on page
81 for details.)
The two methods of recording
Digital
This method records the digital signals from
CDs and MDs. Compared to analog
recording, this method makes it possible to
make recordings of higher quality. Purchase
an optical fiber cable (RP-CA2110A or RP-
CA2210A, sold separately) to record
digitally.
Analog
Use this method to make analog recordings
of digital material, CDs and MDs, and to
record analog sources such as the radio.
Purchase a line cord (RP-CAPM3G15 or
RP-CAM3G15, sold separately) to make
analog recordings.