


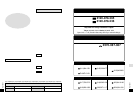


RQT5997
ENGLISH
RQT5997
Operating Instructions
Operating Instructions
∫
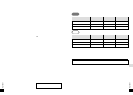
Recharging time and duration
(When using the supplied battery.)
Charging : Approx. 3.5 hours
Play time
Normal stereo mode : Approx. 25 hours
LP2 stereo mode : Approx. 33 hours
LP4 stereo mode : Approx. 38 hours
Recording time
Normal stereo mode : Approx. 12.5 hours
LP2 stereo mode : Approx. 17 hours
LP4 stereo mode : Approx. 21 hours
≥
Duration may be reduced under some
conditions.
≥
If the unit is to be used for long periods,
such as during recording, use the AC
adaptor to power it.
∫
Follow-on recharging
It is not necessary to completely discharge
Panasonic’s nickel-metal hydride rechargeable
batteries before recharging them.
∫
Rechargeable number of times
About 300.
The battery has reached the end of its useful
life if play time dramatically reduces after
recharging.
∫
Replacement
Nickel-metal hydride rechargeable battery
(HHF-1PSC/1B, HHF-AZ01S/1B).
Dry cell battery (not included)
Use one LR6 alkaline battery. Use long -life
Panasonic alkaline batteries.
1
Put the battery into the battery case.
2
Attach the case to the unit.
Note
Insert the rechargeable battery when
recording on dry cell batteries.
∫
For longer use
Use the two types of batteries at the same time.
The battery indicator and
battery flat alarm
The indicator flashes, when the battery is
almost flat. The battery flat alarm also
sounds three times. Recharge or replace the
battery.
To turn off alarm
Press and hold [T.MARK/EQ] on the remote
control until “BArm OFF” appears. Press and
hold again to turn alarm on. Depending on the
type of music and volume, the alarm may be
difficult to hear.
Using the AC adaptor
Connect the AC adaptor.
Use only the supplied AC adaptor. Use of
other adaptors can damage the unit.
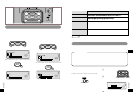
Supplied Accessories
Refer to the illustration on page 3 of the
Japanese text.
≥
Stereo earphones
≥
Wired remote control
≥
Nickel-metal hydride rechargeable battery
≥
External battery case
≥
AC adaptor
≥
Carrying case
The HOLD Function
Refer to the illustration on page 17 of the
Japanese text.
This function stops the unit and remote
control from responding when a button is
pressed.
Guards against the following
≥
The unit is powered on accidentally when not
in use, causing the batteries to run down.
≥
A button is accidentally pressed during
play or recording, interrupting the
operation.
There is a HOLD switch on both the unit
and remote control, each of which works
independent of the other.
∫
The “HOLD” display
This is displayed for a few seconds on the
main unit's and the remote control's display
panels when the following occurs.
≥
The main unit is on hold and a button is
pressed. (When off, display appears only if
[
1
;
CHARA] or [REC
➞
LP MODE] is
operated.)
≥
The remote control's switch is moved to
hold.
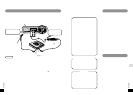
Insert an MD
Refer to the illustration on page 18 of the
Japanese text.
1
Slide [OPEN
1
] in the direction of the
arrow to open the lid.
2
Slide the MD between the guides so it
clicks into place.
3
Now close the lid.
After you insert the MD, the unit turns on,
reads the information from it, after a minute,
the unit turns off.
The title of the disc and song is shown. The
title scrolls if it can not be displayed all at
once. “BLANK DISC” is displayed when you
insert a blank MD.
Removing the disc
Slide [OPEN
1
] in the direction of the
arrow and the disc springs out from the unit.
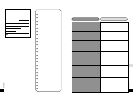
Location of Controls
Refer to the illustrations on pages 12 to
14 of the Japanese text.
∫
Main unit
1
Tone/recording sensitivity/space
button (EQ/REC SENS, SPACE)
2
Display, capital/lower case button
(DISP, CAPS)
3
Menu select, track number select,
character select (
:
!
,
#
9
)
4
Volume and cursor buttons (
M
s r
L
VOL/CURSOR)
5
Play and record mode/character delete
button (MODE, DELETE)
6
To add track marks, to confirm items
selected with
3
(ENTER)
7
Rechargeable battery compartment
cover (
2
OPEN)
8
Display
9
Play/record/pause/power on/character
type button (
1
;
CHARA)
:
Open switch (OPEN
1
)
;
Recording pause/power on/LP
recording switch (REC
➞
,
LP MODE
)
<
Hold switch (HOLD
➞
)
=
Microphone jack (MIC (
PLUG IN POWER
))
>
Optical digital in/line in jack (OPT/LINE
IN)
?
Stop/operation off/edit cancel button
( , OPR OFF)
@
Headphone jack (
Ë
)
A
Entering edit mode, completing edit
,changing track mark mode button
(EDIT, MARK MODE)
B
DC IN jack (DC IN 1.8 V
K
)
C
Connection terminal for battery case
∫
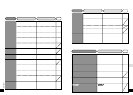
Main unit display
1
Recording indicator
2
Level meter
3
LP recording indicator
4
Synchronized recording indicator
5
Remaining recording/playing time
indicator
6
Sound quality indicators
7
Battery indicator
8
Track number, Text
9
Play mode indicator
:
Disc mark
∫
Wired remote control
1
Display
2
Hold switch (HOLD
1
)
3
Volume control buttons (
i
,
j
)
4
Play/record/stop button (
1
/
∫
)
5
Skip/search(forward) button (
9
)
6
Skip/search(backward) button (
:
)
7
Earphone jack
8
Light/display button (
$
LIGHT/
%
DISP)
9
Play mode button (PLAY MODE)
:
Track mark/tone control button
(T.MARK/EQ )
;
Clip
<
Plug
∫
Remote control display
1
Sound quality indicators
2
Recording indicator
3
Battery indicator
4
Play mode indicator
5
Disc mark
6
Text
7
Track number
∫
Stereo earphones
1
Plug
2
Slider
Slide up to prevent tangling the cord
when the earphones are not in use.
Refer to the illustrations on pages 15 to
17 of the Japanese text.
The rechargeable battery
1
Put the battery into the unit.
The unit cannot recharge batteries other
than the one supplied or recommended
replacements.
2
Connect the AC adaptor.
Recharging begins.
“CHARGE” appears on the display while
recharging.
“CHARGE” disappears when the battery is
fully charged. It takes approximately 3.5
hours to recharge the supplied battery.
3
Disconnect the AC adaptor from the
[DC IN 1.8 V
K
] terminal and the
AC outlet.
Note
≥
The unit can only be recharged while it is off.
≥
The AC adaptor and battery may become
warm during recharging but this is normal.
Power Supply
Note
If the unit is not to be used for a long time
disconnect the AC adaptor from the AC
outlet and turn the unit off to save power. It
is normal for the unit to make some sounds
when you connect the AC adaptor or insert
the battery as it initializes itself.