4
Step 1
RQT7523
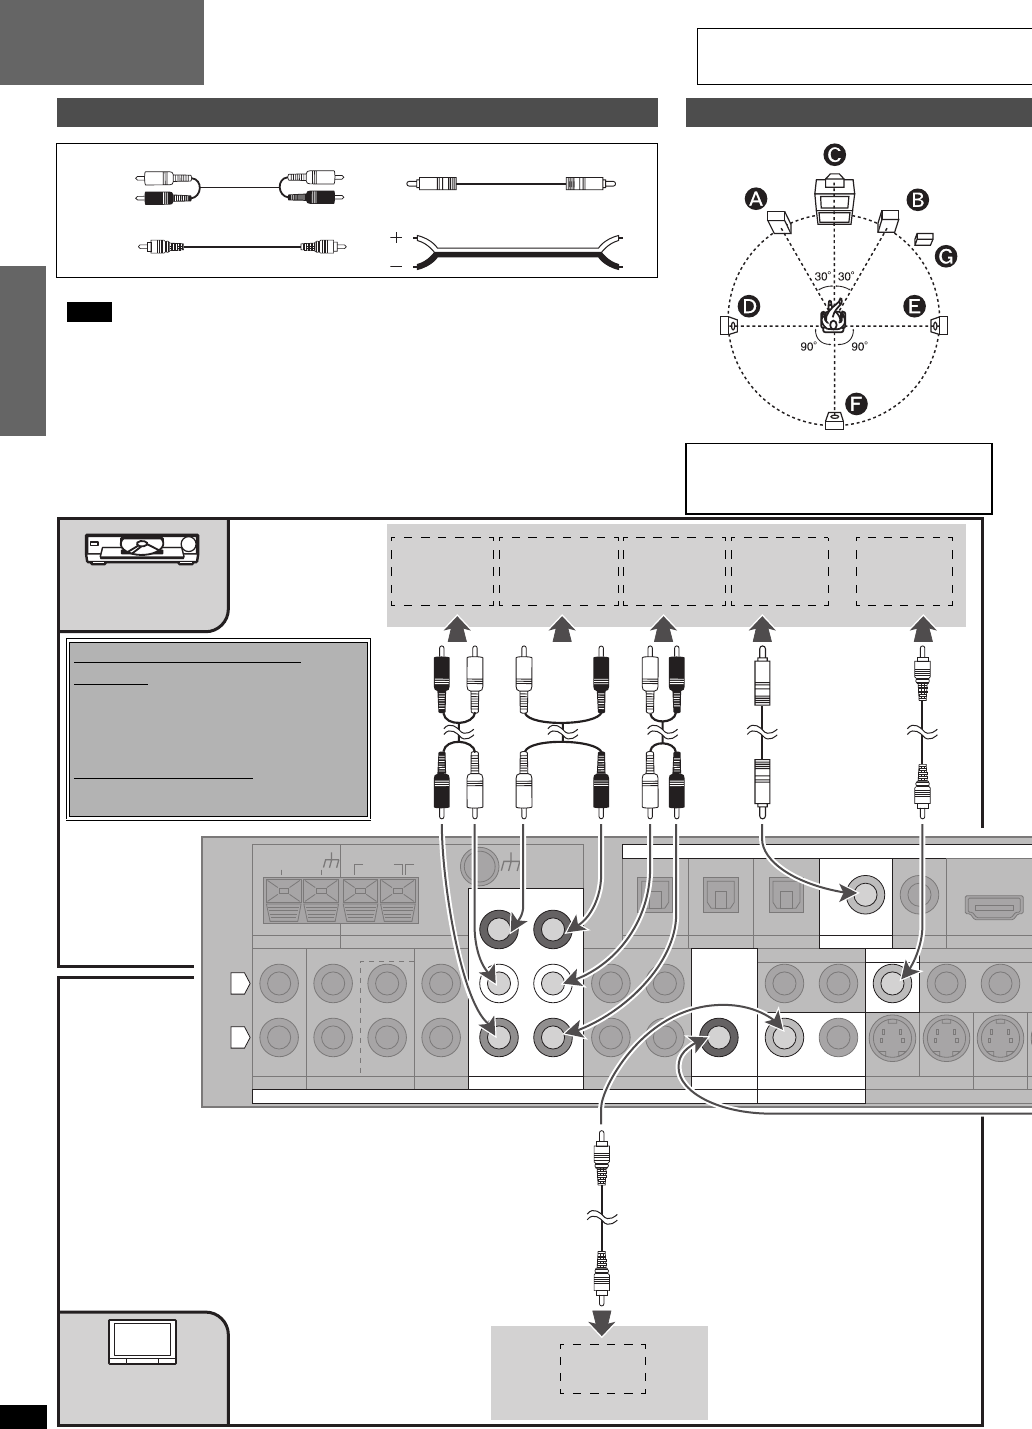
Home Theater connections
Before connecting
1
Placement of speakers
111
Stereo connection cable Coaxial cable
1
Video connection cable Speaker cable
1
Turn off all components before making any connections.
Note
• Use a digital connection to enjoy Dolby Digital or DTS and record digital sources (
á
pages 16 and 25).
• Use an analog connection to enjoy sources that cannot be decoded on this unit, to record
analog sources and to output through SECOND AUDIO OUT (ápages 10, 16, 24 and 25).
• When setting the On Screen Display (á page 12) connect the television’s VIDEO IN terminal
to this unit’s VIDEO TV MONITOR OUT terminal (á below).
• Enjoy higher picture quality using the S VIDEO or COMPONENT terminal (á page 9).
• Refer to pages 6 through 10 regarding connections to other equipment.
1
1
1
The front, center, and surround speakers
should be placed at approximately the same
distance from the seating area. The angles in
the diagram are approximate.
White (L)
Red (R)
75Ω
GND LOOP EXT
FM ANT AM ANT
IN
CD
L
R
REC(OUT) PLAY(IN)
TA PE
LOOP ANT
GND
IN
TV DVR/VCR1
OUT IN
OUT
OPTICAL
(TV) IN
OPTICAL1 OPTICAL2
(DVR) IN
COAXIAL2
(CD) IN
OUT
IN
DVR/VCR1
MONITOR OUT
TV MONITOR O
U
YP
B
P
IN IN
TV DVD
D
S VIDEO
DIGITAL
CENTER
SUBWOOFER
SURROUND
FRONT
DVD/DVD 6CH
AUDIO
COAXIAL1
IN
DVD
VIDEO
MONITOR OUT
IN
TV
(DVD) IN
OUT
SUBWOOFER
SECOND AUDIO OUT
OUT
AUDIO OUT
(SURROUND
L, R)
AUDIO OUT
(CENTER,
SUBWOOFER)
AUDIO OUT
(FRONT
L, R)
DIGITAL
AUDIO OUT
VIDEO OUT
VIDEO IN
DVD player
TV or
monitor
Changing the digital input
settings
You can change the input settings for the digital
terminals if necessary. Note the equipment you
have connected to the terminals, then change
the settings (á pages 12 or 14).
Note on analog input
Connect to FRONT L, R if your DVD player
does not have 6 channel output.
Step 1
DVD player/
TV or monitor


