


Panasonic Consumer Electronics
Company, Division of Matsushita
Electric Corporation of America
One Panasonic Way Secaucus,
New Jersey 07094
http://www.panasonic.com
Panasonic Sales Company,
Division of Matsushita Electric of
Puerto Rico, Inc. (“PSC”)
Ave. 65 de Infantería, Km. 9.5
San Gabriel Industrial Park, Carolina,
Puerto Rico 00985
Panasonic Canada Inc.
5770 Ambler Drive
Mississauga, Ontario
L4W 2T3
www.panasonic.ca
2004 Matsushita Electric Industrial Co., Ltd
Printed in Malaysia
28
Reference
RQT7523
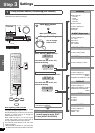
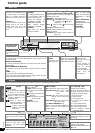
Troubleshooting guide
Before requesting service, make the following checks. If you are in doubt about some of the check points, or if the remedies indicated in the
chart do not solve the problem, refer to the “Customer Services Directory” on page 27 if you reside in the U.S.A., or refer to the “Product
information” on page 26 if you reside in Canada.
n Common problems Pages
n Sound modes Pages
n Radio Pages
n Multi control menus and factory settings
(Reference pages are shown as black circled numbers )
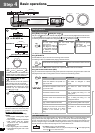
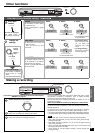
No power. • Ensure the AC power supply cord is connected. 5
No sound.
Sound is distorted.
• Turn the volume up.
• Check connections to speakers and other equipment.
• Turn on the speakers.
• Turn off the tape monitor.
• Select the correct source.
•C
hange the Digital Input/D-INPUT or HDMI/HDMI SEL setting to suit the type of connection you have made.
• Check that the digital signals can be decoded by this unit.
• Turn PCM FIX or DTS FIX off.
• Down-mixing of some DVD-Audio discs may not be possible due to copyright protection.
In this case, play may not be normal if:
− SPEAKERS B has been selected.
− Not all the 5.1-channel setting speakers have been selected.
16
4-10
16
19
16
12, 14
16
12, 14, 22
18
–
When using a HDMI connection, the
first few seconds of sound is cut off.
• Should you be playing a chapter on a DVD:
− Change the audio output setting on the DVD player or DVD recorder from “Bitstream” to
“PCM”. (6.1-channel sources will however be played as 5.1-channel and the 6.1 CH
DECODING mode cannot be used.)
If playing a 2-channel source, set the Input Mode/IN MODE to PCM FIX.
–
12, 14
Sound stops. “F 76” or “OVERLOAD”
appears on the display for about a
second, and the unit turns off.
• Determine and correct the cause, then turn the unit on.
Causes include:
− Shorting (bare wires touching) of positive and negative speaker wires.
− Using speakers with an impedance lower than that rated for this unit.
− Straining of the speakers through excessive volume or power.
− Using the unit in a hot environment without proper ventilation.
Consult your dealer if the problem occurs again after switching the unit on.
5, 6
5, 6
–
–
“F 70” appears on the display. • Turn the unit off, disconnect the AC power supply cord, and consult your dealer. –
“U 70-1-1” appears on the display.
• The equipment connected by the HDMI cable is not compatible with the unit’s copyright protection technology.
–
“U 70-1-2” appears on the display.
• The unit has received a signal for a picture format that is incompatible with the HDMI connection.
Check the settings of the connected equipment.
–
“U 70- 3” appears on the display.
• Should anything unusual happen using a HDMI connection:
− Turn the connected equipment on again.
− Pull out the HDMI cable then reinsert it.
−
Reduce the amount of equipment connected in series to the HDMI terminal if exceeding 2 units.
–
Sound is not heard from the center,
surround, or subwoofer speakers.
• Ensure the speaker settings for your speakers are correct.
• Turn 2CH MIX off.
• The source may be stereo. Change the sound mode.
12, 14
17
16
Sound is not heard from the surround
back speaker.
• Ensure the speaker settings for your speakers are correct.
• Turn 6.1CH DECODING mode on.
12, 14
16
Cannot use Dolby Pro Logic Ⅱx/
Dolby Pro Logic Ⅱ, DTS NEO:6 or
SFC.
• Turn DVD ANALOG 6CH off.
• You cannot use Dolby Pro Logic Ⅱx, Dolby Pro Logic Ⅱ, DTS NEO:6 or SFC when input is PCM
with sampling frequencies of 192, 176.4 (COAXIAL1, HDMI), 96 or 88.2 kHz.
19
17
There is no DTS audio output.
There is audio output, but the DTS
decoder indicator is not lit.
• Check the DVD player’s digital output settings. –
The radio cannot be tuned in or there
is a lot of noise and interference.
• Connect the appropriate antenna. (You may need an outdoor antenna or one with more elements.)
• Adjust the position of the FM or AM antenna.
• Reduce the treble.
• Turn off nearby televisions, video decks, DVD players, and satellite receivers.
• Separate the antenna from other cables, cords, and appliances.
7
7
24
–
–
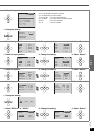
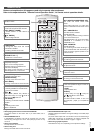
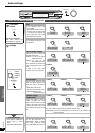
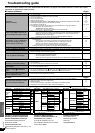
Main menu
Sub menu (factory settings)
Main menu
Sub menu (factory settings)
Main menu Sub menu
(factory settings)
TUNER
(TUNER
mode
only)
TUNING MANUAL
OPTION
B PROOF MODE A
SETUP 2
SPEAKERS
FRONT
SMALL
FM MODE AUTO RESET YES
CENTER
MEMORY CH 1
SETUP 1
SPEAKERS
SUBW YES
LCR S SB
SURROUND
AUTO MEM
START SUBW NO
SUR BACK
YES
TONE
BASS
0dB
D-INPUT
TV OPT 1 SUB-WFR
TREBLE DVR OPT 2
DISTANCE
FRONT
10 FEET
BALANCE
L R DVD COAX 1 CENTER
DIMMER
OFF
CD COAX 2
SURROUND
5 FEET
ON LEVEL 2 HDMI SEL DVD
SUR BACK
SLEEP
OFF
IN MODE
TV
AUTO
FILTER 100
OPTION
SECOND-A
DISABLE
DVR
HQ MODE
DISPLAY OFF
ENABLE
SOURCE
DVD VIDEO OFF
DUAL PRG
MAIN CD
EXIT
áExit the Multi control
DR COMP OFF
A/D ATT OFF