


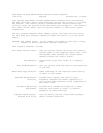

Before you mount the stereo, use a Phillips screwdriver to remove the
screw, spacer, and rubber washer from the top of the stereo. This allows
you to remove the mounting sleeve from the stereo.
Note: Save the screw, spacer, and rubber washer in case you ever want to
ship the stereo. You can secure them to the back of the stereo with
a piece of tape.
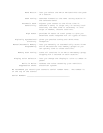
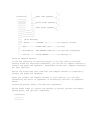
Making The Connections
The supplied harness with the 14-pin connector includes all the lead wires
you need to connect the stereo to ground, power, some optional components,
and speakers.
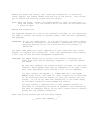
IMPORTANT: Do not cut these wires. If you cut any wire, you cannot obtain
a refund or exchange on this product. RadioShack will provide
warranty service if you cut a wire and find the product is
defective.
You might need additional wire, depending on your individual auto sound
system, to complete the connections. Your local RadioShack store carries
a full line of wire and wire management accessories.
CAUTIONS: For added safety and to protect your stereo, disconnect the
cable from your vehicle battery's negative (-) terminal before
you begin.
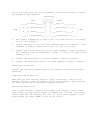
Be sure your speakers can handle 22 watts of power (11 watts per
channel). Each speaker must have an impedance of at least 4 Ohms
Your local RadioShack store carries a full line of speakers.
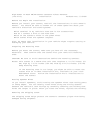
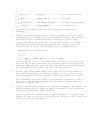
You must connect the GROUND (-), POWER LEAD (B+), and CLOCK
MEMORY wires first, then make all other connections as described
in the following sections before you plug the harness into the
stereo. If you do not make the connections in the order shown,
an incorrect connection could damage the stereo.
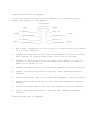
You must connect a separate wire to each speaker terminal as
described in "Connecting Two Pairs of Speakers" and "Connecting
One Pair of Speakers" below. Do not use a common wire or chassis
ground for any speaker connection.
Note: The wiring harness has the following labels:
_ +
____Front Left Speaker__/