wound on the reels. This can cause playback sound quality to deteriorate.
To restore the sound quality, fast-forward the tape from the beginning to
the end of one side, then completely rewind it. Then loosen the tape reels
by gently tapping each side of the cassette's outer shell on a flat
surface.
CAUTION: Be careful not to damage the cassette when tapping it. Do not
touch the exposed tape or allow any sharp objects near the
cassette.
Replacing A Fuse
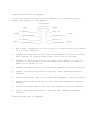
If the clock resets or stored stations are lost when the ignition is off,
you might need to replace the yellow continuous power wire's fuse with a
fuse such as Cat. No. 270-1003 (not supplied). If the stereo does not
operate, you might need to replace the red power wire's fuse with a fuse
such as Cat. No. 270-1012 (the supplied spare fuse is one). Check both
fuses.
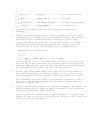
1. Disconnect the cable from the vehicle battery's negative (-) terminal.
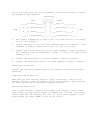
2. To open a fuse holder, pull the latches apart until it opens. Then, to
remove the fuse, gently pull one of the fuse holder's wires up and
pull the fuse off of both wire clips inside the fuse holder.
3. If either fuse is blown, replace it. Use only standard 1-1/4 inch
fuses with the proper rating. The yellow continuous power wire's fuse
must be 0.5 amps, and the red power wire's fuse must be 6 amps.
CAUTION: Make sure you replace a fuse only with another fuse of the
same rating.
4. Reassemble the fuse holders by placing the wires back inside the
holders then squeezing them together until they snap shut.
5. Reconnect the cable to the vehicle battery's negative (-) terminal.
6. Reset your stereo's clock and memory settings as well as other vehicle
accessories.


