


71
Recording a Source—Continued
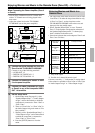
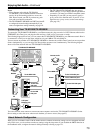
You can add audio signals from a source to a video of
another source to make your own custom video record-
ings. Below is an example of recording audio signals
from a CD player connected to the DIGITAL IN OPTI-
CAL 2 jack and the video from a video camera con-
nected to VIDEO IN 3 onto a video cassette tape on a
VCR connected to VIDEO OUT 2.
Operate this function in the main room.
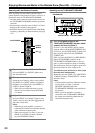
3
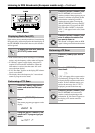
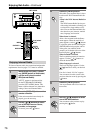
Press the [REC/ZONE3] button, and within
3 seconds, select the source to be
recorded with the [CONTROL/TUNING]
dial.
Pressing the [REC/ZONE 3] button makes the
[STANDBY] indicator blink for 3 seconds.
Select the target sources while the indicator is
blinking. The name of the source to be recorded
is indicated in the display window. Audio/video
recording is enabled on the component for which
“Rec Out” was specified in step 2.
4
Prepare the component for audio/video
recording (recorder side).
5
Start audio/video recording.
You cannot listen to a broadcast from one station
while recording a broadcast from another station.
Recording the Video from One Source
and the Audio from Another Source
1
Turn on the power supply to the
TX-NR1000/TX-NR5000E in MAIN A or
MAIN B mode.
2
Check connections and settings to the
recording component.
Refer to steps 2 and 3 in “Recording Audio/Video
While Playing” on page 70.
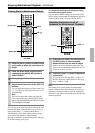
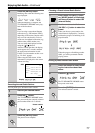
3
Press the [CD] input source button.
4
Press the [SETUP] button to display Main
menu, and turn the [SELECT/PRESET]
dial to select “Input Setup.”
After selecting “Input Setup,” press the
[SELECT/PRESET] dial.
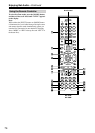
To carry out steps 3-6 on the remote controller, fol-
low the procedures described on page 86.
5
Turn the [SELECT/PRESET] dial to select
“Video Assign,” and press the [SELECT/
PRESET] dial.
6
Turn the [SELECT/PRESET] dial to select
“Composite Video,” and set it to “3” with
the [CONTROL/TUNING] dial.
After setting to “3,” press the [SETUP] button.
7
Insert a CD in the CD player and insert a
tape in the video camera connected to the
VIDEO IN 3 jacks.
8
Insert a tape in the VCR connected to the
VIDEO OUT 2 jacks.
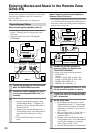
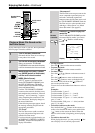
9
Press the [REC/ZONE 3] button, and
within 3 seconds, select “Rec Sel:CD”
with the [CONTROL/TUNING] dial.
Now, the CD player has been selected as the audio
input source, and VIDEO 3 as the video input
source.
10
Start recording on the VCR, and start play-
ing on the CD player and the video cam-
era.
Playback starts on the component selected in
steps 3-6.
Note:
Switching the source during audio/video record-
ing will record the source newly selected.