


46
Connecting Components not
Reached by the Remote Controller
Signals (IR IN/OUT)—Continued
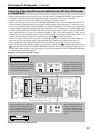
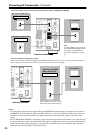
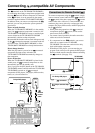
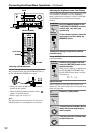
Effective Sensor Layout
In this situation, you will need to use a commercially
available IR emitter. Connect the mini plug of the IR
emitter to the IR OUT terminal on the TX-NR1000/
TX-NR5000E and then place the IR emitter on the
remote sensor of the component or facing it. When the
IR emitter is connected, only the signal input to the IR
IN terminal is output to the IR OUT terminal. The sig-
nal input from the remote sensor on the front of the
TX-NR1000/TX-NR5000E will not be output to the IR
OUT terminal.
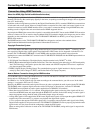
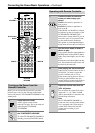
Making Sensor Connections
When you place the IR receiver in the main room, con-
nect the cable from the connecting block to the IR OUT
MAIN terminal. When you place the IR receiver in the
remote zone, connect the cable from the connecting
block to the ZONE 2 or ZONE 3 terminal accordingly.
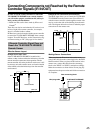
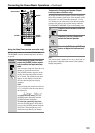
Using an External
Device with 12V Trigger
Terminal
You can automatically turn on the connected AV com-
ponents with the output signal from the TX-NR1000/
TX-NR5000E’s 12V TRIGGER OUT terminal.
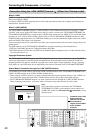
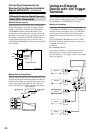
Making a Connection
Connect the 12V TRIGGER OUT terminal on the
TX-NR1000/TX-NR5000E to the 12V TRIGGER IN
terminal on other components. Every 12V TRIGGER
OUT terminal can be connected to the components
whether they are placed in the main room, Zone 2, or
Zone 3.
The TX-NR1000/TX-NR5000E has five 12V TRIG-
GER OUT terminals and the maximum currents to be
connected are as follows:
A: 200 mA
B, C, D and E: 100 mA
After making connections, configure the association
between the room (zone) and the component to be
turned on (Refer to “12V Trigger Assign” under “Input
Setup” on page 98).
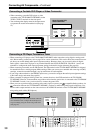
If Remote Controller Signal Does not
Reach Other Components
IR Receiver
Remote controller
Connecting
block
IR IN
IR OUT
IR Emitter
TX-NR1000/
TX-NR5000E
Other
component
: Signal flow
MAIN
ZONE
3
ZONE
2
OUT
IN
IR
: Signal flow
Other component
Emitter
Remote control
sensor
IR Emitter
Mini plug
TX-NR1000/TX-NR5000E
12V
TRIGGER
OUT
A
C
B
D
E
200mA MAX.
100mA MAX.
100mA MAX.
100mA MAX.
100mA MAX.
200mA MAX.
12V TRIGGER
IN
100mA MAX.
12V TRIGGER
IN
100mA MAX.
12V TRIGGER
IN
100mA MAX.
12V TRIGGER
IN
100mA MAX.
12V TRIGGER
IN
Device A
Device B
Device C
Device D
Device E