


2
IPRD SERIES OWNER’S MANUAL
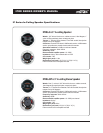
Features and Benefits
Your OMAGE IN-PERFORMA speakers are designed to blend seamlessly into your home interior while providing superior
sound quality.
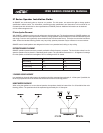
Installation
All OMAGE IN-PERFORMA products feature a self-engaging mounting system that does not require brackets. Simply
cut a hole in the mounting surface, then remove the grille from the frame. Then tighten the four or six mounting “dogs”
using the front panel screws. The dogs will automatically rotate 90 degrees then clamp the speaker frame to the mounting
surface as you tighten the screws. Do not over tighten. Connect the wires and mount the baffle back on the frame.
Pre-Construction Bracket
IN-PERFORMA offers pre-construction brackets with all its custom installed speakers. The pre-construction brackets
can be installed where the speakers will be mounted before the drywall goes up. The drywall contractor will cut the
corresponding holes as the drywall is installed. This reduces the installation time and allows for pre-planned wiring.
Cut-Out Template and Paint Mask
All IN-PERFORMA speakers includes a Cut-out template and paint mask. The Cut-out template allows the installer to
accurately measure the hole to be cut in the dry wall. The Paint mask provides protection for the woofer and tweeter while
painting the speakers frame and grille.
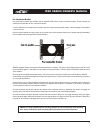
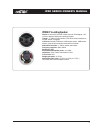
Stable Tweeter Housing
The two-piece baffle design allows the tweeter to be directly mounted on the bridge itself rather than the pole mounting
found in most current designs. This setup allows the speaker to handle more power with increased cone stability, resulting
in decreased harmonic distortion.
Refer all servicing to qualified service personnel. Servicing is required when the apparatus has been damaged in any way, liquid has
been spilled or objects have fallen into the apparatus, the apparatus has been exposed to rain or moisture, does not operate normally,
or has been dropped.
No user-serviceable parts inside. Refer all servicing to qualified service personnel.
Warning: To reduce the risk of fire or electrical shock, do not expose this apparatus to rain, other liquids or moisture.
Warning: To prevent injury, this apparatus must be securely attached to the wall/ceiling in accordance with the installation
instructions. No naked flame sources such as candles should be placed close to the product.
Caution: Changes or modifications not expressly approved by the manufacturer could void the user’s warranty to operate this device.
Installation - Important Safety Instructions
Do not use this or other electrical equipment near water or other liquids.
Clean only with a dry cloth.
Do not block any ventilation openings. Install in accordance with all safety standards and regulations.
Do not install near any heat sources such as stoves, radiators, heat registers, amplifiers or any other
apparatus producing heat.
Use attachments and accessories as indicated by the manufacturer.