


18
INSTALLATION
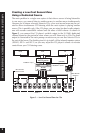
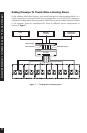
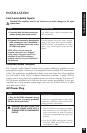
Line Level Audio Inputs
Caution! The amplifier must be off whenever you make changes to the input
connections.
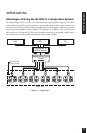
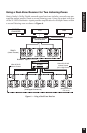
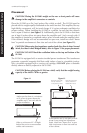
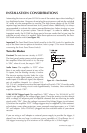
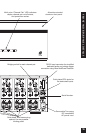
Cascade Audio Outputs
The “Cascade Audio Outputs” enable you to connect additional amplifiers to your
preamplifier’s output. Connection is accomplished with standard RCA interconnect
cables. The outputs are not buffered; to daisy chain more than five Niles amplifiers
you will need a Niles AVDA-3 buffered distribution amplifier. A single AVDA-3
enables you to daisy chain five amplifiers from each of three outputs. This allows 15
SI-1260 power amplifiers to be fed from the same master preamplifier. If your pre-
amplifier has a vacuum tube output stage, you must use a Niles AVDA-3 to drive
more than one SI-1260.
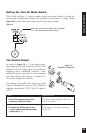
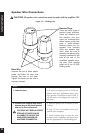
AC Power Plug
STEP
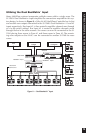
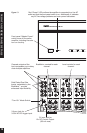
1. Correctly label the interconnecting
cables coming from each source.
2. Connect the sources by inserting the
RCA connectors into a BusMatrix™
input or dedicated input jack on the
SI-1260’s rear panel.
NOTE: When you are using two
amplifier channels in the “bridged”
mode, assign the audio signal to be
amplified to the EVEN numbered
amplifier channel using the BusMatrix™
Dip Switches.
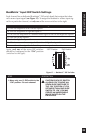
DESCRIPTION
Use audio patch cables terminated with
RCA connectors.
Connect outputs from your source compo-
nents to the input jacks on the amplifier.
NEVER connect a preamplifier or source
input (e.g., record inputs) to the SI-1260
inputs.
STEP
1. Plug the SI-1260’s attached 2 prong
power cord into a correctly grounded
120 Volt, 60-Hz wall outlet.
CAUTION! DO NOT PLUG THE
SI-1260’S POWER CORD INTO A
PREAMPLIFIER’S CONVENIENCE
OUTLET.
DESCRIPTION
If you use a grounded power strip, surge
protector, or extension cord, verify that the
proper ground is maintained
1. The SI-1260 draws a maximum of about
890 watts from an AC wall outlet. This is
much more than the typical accessory
outlet on a component’s rear panel can
provide.
2. Use the SI-1260’s auto turn-on circuitry
to switch “ON” the SI-1260 when the
preamplifier is “ON”.
INSTALLATION