


21
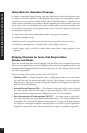
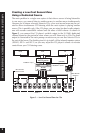
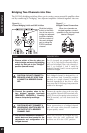
Bridging Two Channels into One
The SI-1260’s bridging switches allow you to create a more powerful amplifier chan-
nel by combining or “bridging” two adjacent amplifier channels together into one.
Slide the bridging
switch in the direc-
tion of the arrow to
bridge two adjacent
amplifier channels.
Set the controls of
the newly bridged
pair by using the
EVEN numbered
channel.
When two channels are
bridged together, connect
speakers to the two terminals
labeled “Bridged”.
STEP
1. Choose which of the six pairs you
wish to bridge and move the bridging
switch for that pair to the “Bridged”
position (toward arrow).
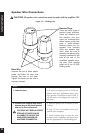
CAUTION! DO NOT CONNECT A
SPEAKER LOAD OF LESS THAN
4 OHMS TO A BRIDGED CHAN-
NEL.
2. Connect the speaker wires to the
two bridged speaker terminals
(BRIDGED+, BRIDGED-). Carefully
observe the polarity markings.
CAUTION! DO NOT CONNECT A
HEADPHONE JUNCTION BOX TO
THE OUTPUT OF A BRIDGED
CHANNEL PAIR.
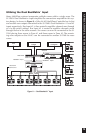
3. Use the EVEN NUMBERED BusMatrix
™
switch bank and level control for the
adjustments and configuration of a
bridged channel.
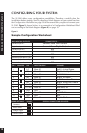
DESCRIPTION
The 12 channels are grouped into 6 pairs
(e.g. 1 & 2). Only the two channels within a
pair can be bridged. Thus, only channels 1
and 2, or channels 3 and 4 could be
bridged. Channel 2 and 3 are not a pair and
cannot be bridged.
Each bridged channel is designed for a 4
ohm minimum load. Connecting multiple
speakers to a single channel, creating a
nominal impedance of less than 4 ohms
may cause the SI-1260 to go into protection
mode or be damaged.
Connect the speaker wires to the two adja-
cent amplifier channel’s RED terminals only.
NOTE: If one of the speaker wires touches a
BLACK terminal, you will short-circuit the
amplifier.
These connections to a bridged channel
pair will cause either thermal shutdown
or poor quality sound.
When two channels are bridged into one,
ensure that the odd numbered DIP
switches are all in the “OFF” position.
Figure 17 —
Bridged Channel Connections
Figure 16
—
Channel Bridging Switch and DIP Switches
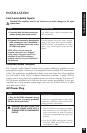
INSTALLATION