


I
NTELLIGENT
P
OWER
C
ONTROLLER
13
by current. After the sequencing stops, the ON LED should be
blinking. This means that the IPC-6 is ready to measure the
device’s “on” state.
3. Turn on the device. The front panel LED's will sequence to
the left and right while the Accusense
TM
circuitry measures
your device. After the sequencing of the LED's stops the
OFF
LED will blink.
4. Turn off the device. The front panel LED's will sequence to
the left and right while the Accusense
TM
circuitry checks your
device. After the sequencing of the LED's stops and the IPC-6
has confirmed the programming, all the front panel LED’s will
light while the IPC-6 stores the program into memory. You
are now back in normal operating mode.
To program the device plugged into the ”B” sensing outlet,
repeat steps 1 through 4 using the “B” button and outlet.
When you begin programming, the IPC-6 will display “Pb”
instead of “PA”.
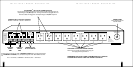
Programming Switched 120 volt and
Controlled (low voltage) Outlets
You will need to program 3 different parameters for each of
the switched outlets (1-6) and control outputs (C1, C2).
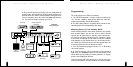
1. Which tri
gger (A, B, or both) will activate the outlet?
Pressing both trigger buttons means that the outlet will be
active if either or both triggers are active.
2. The turn on time del
ay (indicated by the ON LED being lit).
I
NTELLIGENT
P
OWER
C
ONTROLLER
14
Program the delays for each outlet to build your "turn on"
sequence. Delays are calculated in 1 second increments after
your triggering device is turned "on" or "off". Therefore, if
you would like outlet 1 to activate 2 seconds after your trig-
ger device is turned on, program outlet 1's time delay to 02.
If you would like outlet 2 to activate 2 seconds after outlet 1,
program outlet 2's time delay to 04, etc.
3. The turn off time del
ay (indicated by the OFF LED being lit).
Program the delays for each outlet to build your "turn off"
sequence.
Enter the PS programming mode
Turn off the devices plugged into the 2 sensing outlets before
programming any of the switched or controlled outlets or
the IPC-6 will not enter PS programming mode.
Press and hold down the
PROGRAM button on the front panel
of the IPC-6. While you are holding it down, press the
SELECT
button. Release both buttons. When you begin program-
ming the IPC-6 will display "PS" only momentarily.
The IPC-6 will light the
ON and "Outlet 1" LED's. You are now
ready to program the "turn on" sequence for each switched
outlet.
1. Select either or both of the trigger buttons (A, B). This will
determine which device(s) will trigger outlet 1 to turn on.
2. Adjust the "on" time delay. The two buttons to the right of
"TECH TIP"
Devices must be
turned off before
programming any
of the outlets.