OPERATING INSTRUCTIONS
UHF-16 Receiver
8
4. Choosing an Operating Frequency
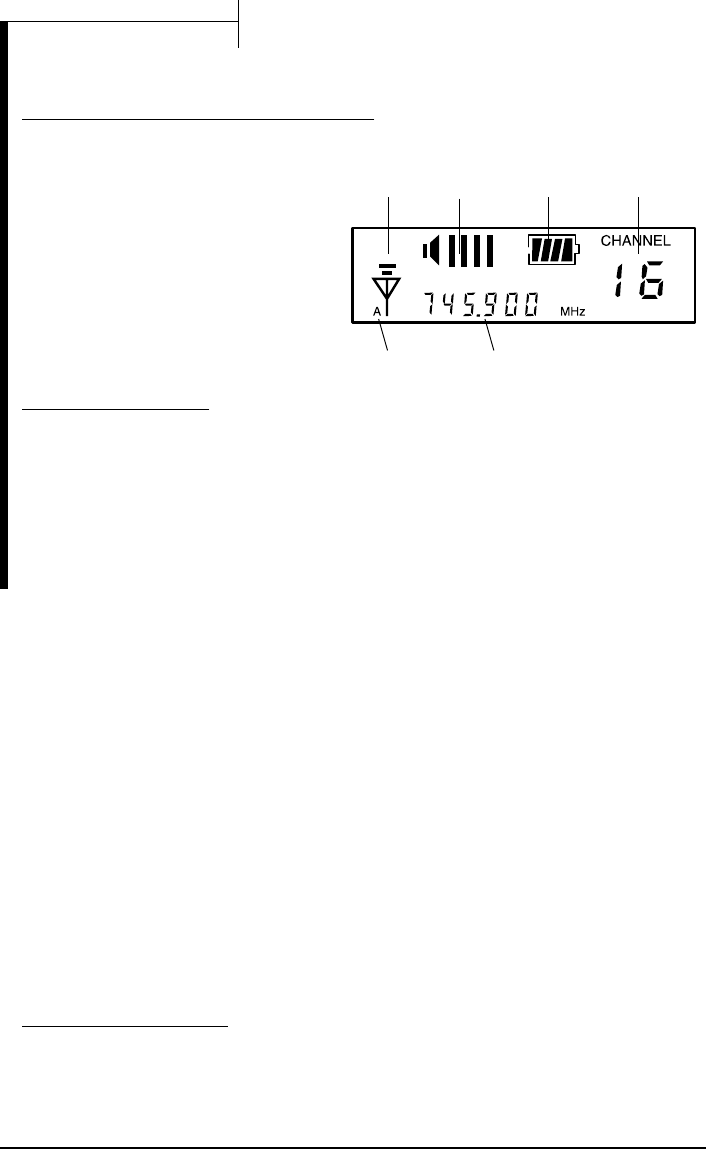
Choose an operating frequency by selecting any of the 16 UHF operating frequencies available in the band
provided, using the UP/DOWN BUTTONS (12). The CHANNEL SELECTED (11d) and OPERATING
FREQUENCY (11f) icons in the LCD DISPLAY
(11) indicate the channel and frequency you
have selected. You must also set your
transmitter UP/DOWN BUTTONS (20,25) to
the same channel you choose on the receiver.
(See UH-16 or UB-16 TRANSMITTER
OPERATING INSTRUCTIONS, page 10 & 13
and CHANNEL DISPLAY AND UP/DOWN
BUTTON OPERATION, page 15). For a listing
of the frequencies in each of the 3 available
bands, see page 16.
5. Mute Adjustment
The receiver has two audio mute circuits.
a. The
Tone Squelch™
blocks the audio noise when the channel signaling tones are not present. It helps
avoid interferences from unwanted transmissions. This feature is strongly recommended for situations
where the transmitter is turned on and off during use. Without Tone Squelch™, an unwanted signal may
enter your inactive receiver when your transmitter is switched off. You then risk a pop or disruptive noise
coming from your sound system. This type of interference is eliminated by the Tone Squelch™. The
receiver detects a tone signal coming from your transmitter, which opens the squelch, allowing your
modulated signal to be heard. This feature is selectable and not recommended for applications where the
transmitter will always be on, or for use with instruments.
The Tone Squelch™ mode can be configured with the Up/Down buttons. See CHANNEL DISPLAY AND
UP/DOWN BUTTON OPERATION, page 15.
(Note: If the receiver is configured for Tone Squelch™ mute, the transmitter must also be configured to
send the tones, otherwise the receiver audio will remain muted. The signaling tones are also used to
display the transmitter battery status. If the Tone Squelch™ is defeated, this function will not be
operational.)
b. The Receive Level Mute
blocks audio noise when the received signal level is too low, or interfering
transmissions are high.
A MUTE (RF SQUELCH) CONTROL (13) is provided on the front panel. This control should be adjusted
counterclockwise to the minimum position at which there is no audio output signal from the receiver when
your transmitter is not in use. This is the most sensitive setting for your receiver and offers the maximum
operating range. However, in areas of high RF activity, the mute may need to be adjusted. When the
transmitter is off and the receiver’s RECEIVED RF LEVEL METER (11a) icon flickers or displays one or
more segments, and/or white noise (hiss) is heard at the receiver output, the MUTE CONTROL (13) should
be turned clockwise until the noise is muted (squelched). Turning the MUTE CONTROL too far clockwise
will reduce operating range but will yield a quieter mute function. Note that the MUTE CONTROL operates
independent of the RF LEVEL METER so that adjusting the MUTE will not affect any readings at the RF
LEVEL METER.
6. Diversity Operation
During operation only one of the A or B DIVERSITY STATUS ICONS (11e) will be lit, indicating the
receiver’s DigiTru Diversity™ circuitry is selecting antenna input A or B for the best signal. This is normal
and ensures that the received audio will not be interrupted. Sometimes, especially at ranges greater than
75 feet, the squelch circuit will activate in certain locations of the transmitter with respect to the receiver.
Such areas are called “null spots” and indicate that the transmitter is out of range for that given location,
and the user should move closer to the receiver or to another area to re-establish the radio link.
(11a) (11b) (11c)
(11d)
(11e) (11f)


