


OPERATING INSTRUCTIONS
UH-16 Handheld Microphone Transmitter
11
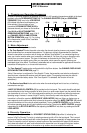
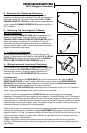
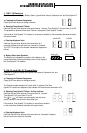
4. Locking the Keyboard
To avoid accidental reconfiguration of the Channel setting or Tone Squelch™, the keyboard can be locked
by holding both the UP and DOWN BUTTONS (20) at the same time for 3 seconds. See the CHANNEL
DISPLAY AND UP/DOWN BUTTON OPERATION, page 15.
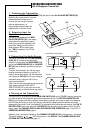
5. Microphone Operation
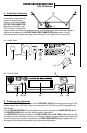
The microphone is now ready to use. The RECEIVED RF LEVEL (11a) icon and either the A or B
DIVERSITY STATUS ICONS (11e) on the UHF-16 receiver should now be lit, indicating a received signal
from the transmitter. The receiver TX LED INDICATOR (10) should be on. When ready to speak, slide the
OFF/STANDBY/ON SWITCH (17) to the ON position. Adjust the volume of the receiver as per the Audio
Output Microphone Connection section of the above UHF-16 receiver instructions.
(
Note: Observe care in selecting P.A. volume, transmitter location and speaker placement so that acoustic
feedback, howling or screeching, will be avoided.)
The UHF-16 receiver is equipped with an AF DISPLAY (11a) icon, which displays up to 4 segments,
depending on the strength of the audio signal from the transmitter. Occasional flickering of the 4
th
bar
segment of this display on loud inputs to the transmitter is normal. If this segment displays continuously,
and/or distortion is heard, decrease the volume to the transmitter. Due to the wide available dynamic range,
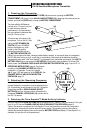
generally no adjustment will ever be needed for the transmitter input gain. There is a control under the mic
ball assembly available for rare cases where it’s desirable to make an input gain adjustment. For
instructions on how to access this internal control, please contact the Nady Systems Customer Service
Department. See SERVICE, page 18.
(Note: The microphone element can easily be destroyed by the buildup of salts and minerals from
perspiration and saliva. It is good practice to put a windscreen on the mic element at all times to protect it.)