


OPERATING INSTRUCTIONS
UHF-16 Receiver
6
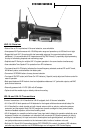
1. Mounting the Receiver
a. Table Mounting
To mount a receiver on a table or other horizontal surface, attach the four supplied rubber feet to the
bottom corners of the receiver and place the receiver on the mounting surface.
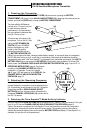
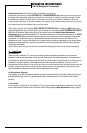
b. Rack Mounting a Single Receiver
If you want to rack mount a single receiver in an audio equipment rack, contact the Nady Systems Service
Department (see SERVICE FOR YOUR NADY
WIRELESS, page 18) for an optional RMK-16S
SINGLE RACK MOUNTING KIT (6a) and proceed as
follows:
1. Attach the rack ears to the 2 holes on each
side of the receiver with the supplied screws
and mount the unit in the 19” audio equipment
rack.
2. If you wish to also front mount the antennas, order the additional FMK-16S FRONT MOUNT
CONVERSION KIT (6b) also from the Nady Service Department when ordering the RMK-16S.
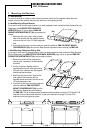
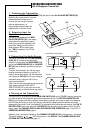
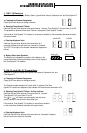
c. Rack Mounting 2 Receivers Side by Side
If you want to rack mount 2 receivers side-by-side in an audio equipment rack, contact the Nady Systems
Service Department (see SERVICE FOR YOUR NADY WIRELESS, page 18) for an optional RMK-16D
DOUBLE RACK MOUNTING KIT (6c) and proceed as follows:
1. Remove the covers of both receivers by
removing the 4 screws on the bottom plate
as shown.
2. Join the 2 receivers together with the
supplied bolts and nuts, while also joining
the back of the receivers with the supplied
double side tape as shown
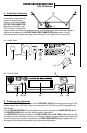
3. Attach the rack ears to the 2 holes on the
outer sides of the receivers with the
supplied screws and mount the units in the
19” audio equipment rack.
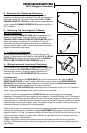
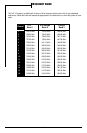
4. If you wish to also front mount the antennas,
order the additional FMK-16D FRONT
MOUNT CONVERSION KIT (6d) from the
Nady Service Department when ordering
the RMK-16D. This kit includes a passive antenna splitter/combiner so that the 2 CH A and CH B
antennas for both side-by-side receivers (4 total) are combined into single CH A and CH B
antennas on the front panel as shown.
(6e)
(6a)
(6b)
(6d)
(6c)