16
SYSTEM OPERATION
Level adjustment
UB-1000 Transmitter
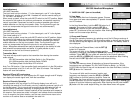
The input level has four choices. “1” is the lowest gain, and “4” is the highest.
For instrument, lavalier mic, and HM-1 headset mic use the normal setting of
“3”. For HM-1 use setting “1”.
When ready to speak, move the audio MUTE switch to the OFF position. Adjust
the volume of the receiver for optimum performance, a transmitter sensitivity
control is provided. Experiment and set for maximum possible gain without
audible distortion on the high level peaks. (Note: Turning down the gain too
much can compromise the signal-to-noise and is not recommended.)
Level adjustment
UH-1000 Transmitter
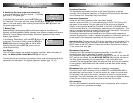
The input level has four choices. “1” is the lowest gain, and “4” is the highest.
The normal setting is “3”.
When ready to speak, move the audio MUTE switch to the UP position. Adjust
the volume of the receiver for optimum performance, a transmitter sensitivity
control is provided. Experiment and set for maximum possible gain without
audible distortion on the high level peaks. (Note: Turning down the gain too
much can compromise the signal-to-noise and is not recommended.)
(Note: Microphone elements can easily be destroyed by the buildup of salts
and minerals from perspiration and saliva. It is good practice to put a
windscreen on the mic at all times to protect it.)
Transmitter Mute
The mute will stop audio inputs to the transmitter from leaving the receiver
audio outputs.
UB-1000 transmitter slide the Mute Switch in the ON position.
UH-1000 transmitter slide the Mute Switch DOWN.
The Battery Weak /Audio Mute LED will blink.
Auto Turn Off function. If the transmitter Audio mute switch is in the ON position
and the transmitter is left On. It will turn OFF after 30 minutes. This foolproof
feature will save the batteries.
Receiver RF and AF Level meters
The UHF-1000 receiver RF icon displays the RF signal strength and AF display
icon displays the audio signal level, from the transmitter.
Receiver Diversity Operation
During operation only one of the A or B Diversity display icons will be lit,
indicating the receiver’s True Diversity circuitry is selecting antenna input A or B
for the best signal. This is normal and ensures that the received audio will not
be interrupted. Sometimes, especially at ranges greater than 75 feet, the
squelch circuit will activate in certain locations of the transmitter with respect to
the receiver. Such areas are called “null spots” and indicate that the transmitter
is out of range for that given location, and the user should move closer to the
receiver or to another area to re-establish the radio link.
9
OPERATING INSTRUCTIONS
UH-1000 Handheld Microphone
2. “NADY UH-1000” (can not be edited)
3. User Name
The User Name field has 8 character spaces. Choose
from upper and lower case alphabet, 27 special characters (including space),
and 10 numbers.
In the User Name Menu, hold the SET (8) button for 3
seconds. The curser will blink, press the UP (9) or
DOWN (10) buttons to cycle the character selection,
press SET to advance to the next location. After finishing the edit hold the SET
button until the curser stops blinking.
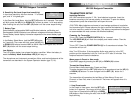
4. Group and Channel
Choose the operating frequency by selecting one of the 24 Groups and one of
the 40 Channels in each group. The first two top digits on the left are the Group
and the second top two digits to the right are the Channel. The battery status is
also displayed.
In the Group and Channel Menu, hold the SET (8)
button for 3 seconds.
The curser will blink in the Group selection and the
frequency is displayed, use UP (9) or DOWN (10) buttons to cycle the Group
selection. Press SET (8), the curser will advance to the Channel selection,
press the UP (9) or DOWN (10) buttons to cycle the selections. After finishing
the edit hold the SET (8) button until the curser stops blinking.
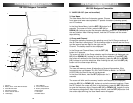
5. User Edit
The user edit memory stores 40 selections of channel frequencies. If the
frequencies are not between 721.000-745.975 MHz for Band-1 or 795.000-
819.975 MHz for Band-2 they will not be saved.In the User Edit Menu, hold the
SET (8) button for 3 seconds.
The curser will blink and the memory location and
frequency are displayed, press the UP (9) or DOWN
(10) buttons to cycle the memory locations. Press the
SET button, the curser will blink in the frequency, press
the SET (8) button to cycle the frequency digits. Press the UP (9) or DOWN (10)
buttons to cycle the frequency assignment. After finishing the edit hold the SET
(8) button until the curser stops blinking, the User Name menu will appear.
NADY
UH-1000
USER NAME
CF: 01 - 01
CF: 01 - 01
721.000
EDIT - 01
721.000


