15
SYSTEM OPERATION
Frequency Selection
The transmitter and receiver must be on the same frequency to operate
correctly. Use the Channel frequency, or Group and Channel menus described
in the Receiver and Transmitter setup instructions.
Instrument Connection
Using the UB-1000 transmitter in the “instrument” setting
Insert an audio cord with a 1/4” mono phone plug in the AF OUT jack on the
rear panel of the receiver. Plug the other end of the cord into an amplifier,
effects, or mixing board. Adjust the VOLUME on the UHF-1000/2000 receiver
until the volume level is 13 or comfortable, depending on your application . This
setting is roughly equivalent to a direct instrument cord connection. Turning the
volume up to MAX will provide 4 dB gain over a cord.
Connecting instruments and microphones to the UB transmitter depends on
customer requirements. Lavalier / Headset microphone or instrument inputs can
be connected to the bodypack transmitter via the audio input connector.
Instrument Use: Connect the mini XLR to the transmitter input connector. Plug
the 1/4” phone plug into the instrument. When ready to play, move the audio
MUTE switch to the OFF position. Adjust the volume of the receiver to setting
13 for, one-to-one, unity gain.
Microphone Connection
Using the UH-1000 handheld microphone transmitter, or the UB-1000
transmitter with either a headworn or lavalier microphone
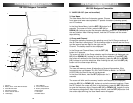
For microphone use, either the BALANCED output XLR or the 1/4” line level AF
OUT jack can be utilized. Set the MIC LINE SWITCH (12) to either mic level or
line level output depending on your application . Plug a cord with either
connector into the appropriate output and plug the other end into your amplifier
or mixing board. (Note: Make sure the volume is turned down when making
connections.)
Microphone Use: (with either a lavalier or headworn microphone)
Connect the mini XLR connector from the LAVALIER or HEADWORN MIC to
the transmitter input connector. To use the lavalier mic, attach it at chest level.
Do not place it too close to the mouth; a distance of about six inches usually
works best. To use the headworn mic, place it on the head and adjust the boom
so that the mic is about one inch to the side of the front of the mouth.
UH transmitter
The UH-1000 handheld transmitter has a built-in microphone, with a choice of
either a dynamic or a condenser cartridge.
10
OPERATING INSTRUCTIONS
UH-1000 Handheld Microphone
6. Sensitivity Set Level (Input level sensitivity)
In input level sensitivity has four choices. “1” is lowest
gain, and “4” is highest gain.
In the Sens Set Level Menu, hold the SET (8) button
for 3 seconds. The curser will blink; press the UP (9) or DOWN (10) buttons to
select 1 of 4 level setting. After finishing the edit hold the SET (8) button until
the curser stops blinking.
7. Battery Type
Select between rechargeable NiMH and Alkaline batteries. As Alkaline (or
Normal) and Rechargeable (NiMH) batteries have different voltages and behave
differently. Correct battery status display information depends on the correct
battery type selection.
In the Battery Select Menu, hold the SET (8) button for
3 seconds. The curser will blink; press the UP (9) or
DOWN (10) buttons to select NiMH or AKLN. After
finishing the edit hold the SET (8) button until the
curser stops blinking.
Low Battery
The LCD display battery icon shows the battery condition. When the battery is
weak, the Battery Weak /Audio Mute LED (3) will stay on.
The microphone and instrument connections, Mute, and level adjustments of the
transmitter are described in the System Operation section (pgs. 15, 16).
SENS SET
LEVEL [ 3 ]
NiMH
ALKL_ =


