


7
10
UB-1K BODYPACK MICROPHONE TRANSMITTER
UWS-1K RECEIVER
1
2
3
4
5
6
7
16
8
9
15
10
18
20
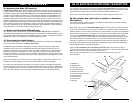
1. Rack ears (optional)
2. Join pieces (optional)
3. Antennas
4. RF screw-on connectors
5. DC input jacks
6. XLR balanced output
7. 1/4” unbalanced output
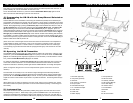
8. Power switch
9. Power LED
10. Menu display
11. Group/Channel
12. RF level meter
13. Diversity indicator
14. RF squelch (MUTE)
15. AF LED display
16. Volume control
17. IR transmitter
18 Transfer
19. Set
20. UP-Down button
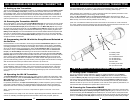
This LED turns red if the batteries are low and the batteries should be replaced with new ones. To
preserve battery life, turn the transmitter off when not in use.
To turn the transmitter off when on, press and hold the Power/Mute Button (32) again for more
than 2 seconds. No LEDs will light up and the unit will be off.
19. Programming the UB-1K with the Group/Channel Selected on
the Receiver
Channel selection on the transmitter is done using the wireless IR (infrared) link to download pre-
programmed channels from the receiver (see also sections 4 and 6 above). Immediately upon being
powered on, the unit will be in IR standby, which means it is accepting data previously set up for the
receiver. Start programming by aiming the IR Sensor (36) on the transmitter from about 6” away to
the IR Transmitter (17) on the receive and then press the Transfer Button (18). The Power LED
(9) starts flashing for 20 seconds that indicates IR Transmission (17) is in progress. Upon suc-
cessful data transfer (usually in less then 2 seconds) the transmitter’s IR LED (34) will be turned off
and the transmitter will transmit a radio signal on the same channel as the receiver and the Signal
Strength (12) and Diversity Indicators (13) on the receiver will then start indicating that the IR link
is completed. If no action is taken during 20 seconds, the unit goes into audio standby (audio mute)
mode and the previous program channel remains unchanged. After 20 seconds the IR LED (34) (on
both the UWS-1K and UB-1K) will turn off.
(Note: The IR link is infrared light and thus works best when this data transfer is accomplished in
a light-shielded or darker environment. It may not be successful in a brightly lit area. If the trans-
fer fails, repeat the procedure in a darker location or somehow shield the link from outside light
to successfully program the transmitter with the preprogrammed group and channel info from the
receiver).
20. Operating the UB-1K Transmitter
The POWER button functions both as a power and as an audio mute on/off switch. After the unit is
powered on, press the Power/Mute Button (32) once quickly to unmute the audio. The Mute LED
(33) will turn off allowing audio signal input (speech or from instrument). To mute/unmute in succes-
sion, press the Power/Mute Button (32) again as needed.
For optimum performance, an Input Level Control (31) is provided. Adjust the gain by turning the
control with a small screwdriver. It is recommended that the level be set at about 1⁄2 maximum.
Experiment and set for maximum possible gain without audible distortion on the high level peaks.
(Note: Turning down the gain too much can compromise the signal-to-noise and is not recom-
mended.)
The transmitter is now ready to use. The receiver’s signal strength and the diversity indicators
should now be on, indicating a received signal from the transmitter. When ready to transmit audio,
press the UB-1K’s Power/Mute Button (32) to unmute. To mute, press the POWER button again.
Adjust the volume of the receiver as per section 12 (UWS-1K Receiver: Connecting Audio Output)
above.
[Note: When using in lavalier or headworn mic input mode, observe care in selecting P.A. volume,
transmitter location and speaker placement so that acoustic feedback (howling or screeching) will
be avoided.]
21. Instrument Use
Secure the connection of the GT (instrument) cable by lining up the slot of the mini XLR connec-
tor and pushing in to lock in. When ready to play, press the POWER button once momentarily to
unmute the transmitter audio. Adjust the volume on the receiver for one-to-one, unity gain with a
hardwired cord or select up to an added 4-5dB boost by adjusting the receiver volume to maximum.
1
17
19
11
13 12
14
13