


4
SYSTEM OPERATION
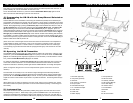
3. UWS-1K Receiver Buttons Function
Each time the Set Button (19) is pressed the LCD Menu (10) display will cycle through the set up
menus in this order: MAIN MENU->CHANNEL->GROUP->SQL->MAIN MENU and then repeat.
The selected function will flash for 20 seconds before returning to the MAIN MENU. To exit from any
setting menus, press Transfer Button (18) once.
When pressing the Transfer Button (18) once while MAIN MENU is displayed, the Power LED (9)
will flash quickly. This LED indicates IR transmission is in progress. Press Transfer Button (18)
again to stop or it will expire in 20 seconds automatically.
The UP-DOWN Rocker button (20) works only while setting the menu. At Power OFF the UWS-1K
receiver will store the last settings entered and re-display them at Power ON. It can be repro-
grammed to any new group/channel, and SQL level. The default factory setting is Group 13, Chan-
nel 01, and SQL 01.
4. Selecting the UWS-1K Receiver Group, Channel,
& SQL Setting
See Section 26 below (RF Interference and Finding Open Channels) also for help in finding desired
channel(s) of operation in setting up your system(s).
Choose the UWS-1K operating frequency by selecting one of 25 Groups and one of 40 Channels
in each group that are determined to be desirable open channels as per the procedure outlined
in Section 26. The first two large digits on the left are the GROUP (11) and the second two large
digits on the right are for the CHANNEL (11). Press the Set Button (19) once to enter the CHAN-
NEL (11) set up mode and then press the UP-DOWN Rocker button (20) once for single stepping
through the channels or hold continuously for faster channel selection. Select one of 40 channels
available from the CHANNEL (11) menu and advance to GROUP (11) set up mode by pressing Set
Button (19) or press Transfer Button (18) to exit.
Press the Set Button (19) again to enter the GROUP (11) set up mode and then press the UP-
DOWN Rocker button (20) once for single stepping through the groups or hold continuously for
faster group selection. Select one out of 25 groups from the GROUP (11) menu and advance to
SQL (14) set up mode by pressing Set Button (19) or press Transfer Button (18) to exit.
Press the Set Button (19) once to enter the SQL (14) set up mode and then press the UP-DOWN
Rocker button (20) once for single stepping through the SQL (RF muting/squelching) levels or
hold continuously for faster SQL level selection. Select one out of 50 levels from the SQL menu and
advance to Exit set up mode by pressing Set Button (19) or press Transfer (18) to exit.
Press Set Button (19) once to exit or press Set (19) twice to restart selection of a different chan-
nel, group, or SQL level. When the exit mode is reached, the new group/channel/SQL selected are
programmed.
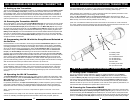
5. UH/UB-1K Transmitters Buttons Function
Press the Power Button (23/32) for more than 2 seconds to power up the transmitter (please also
see section 14 & 18 below). It will now be in standby (audio input muted) mode. Press the Power
Button (23/32) again briefly to unmute or to mute the audio.
13
TIPS
• For optimum operation with external antennas, low loss RF shielded cable should be used and the
length of the cable should not exceed 3m.
• The receiver antennas should be kept away from any metal surfaces whenever possible as they
can reflect or shield from the incoming RF signal.
• If the Volume Control of the receiver is set too high, it may over-drive the input of the attached
audio mixer, causing distortion. Conversely, if the output is set too low, the overall signal-to-noise
ratio of the system may be reduced, causing noticeable hiss. If such noise occurs, adjust the
output level of the receiver such that highest sound pressure level going into the microphone
transmitter causes no input overload in the mixer, and yet permit the mixer level control to operate
in the normal range (not too high and not too low). This provides the optimum signal-to-noise for
the entire system.
• Before inserting the batteries, please make sure that they are inserted with the correct polarity.
• Before operation please confirm that the receiver and associated transmitter are tuned to the
same frequency group and channel number.
• After making a receiver channel change, please make sure that the corresponding change is also
made on the matching transmitter (per Sections 15 & 19).
• Use only brand new alkaline batteries. Do not use “general purpose” batteries. When batteries are
weak, replace the batteries altogether at the same time. Do not mix and use new and old batteries
together.
• Position the receiver such that it has the least possible obstructions between it and the transmitter.
Line of sight is best!
• During operation, the transmitter and the receiver should be as close as possible for optimum
results but never closer than 3’ (1 meter).
• For the best operation, the receiver should be placed at least 1 meter above the ground and 1
meter away from a wall or metal surfaces. The transmitter should be also at least 1 meter from the
receiver. Keep antenna away from noise source such as motors, automobiles, neon light, signal
processor, computer, as well as large metal objects.
• A receiver cannot receive signal from two or more transmitters simultaneously.
• Turn the transmitter off when it is not in use. For longest life, remove the batteries if it is not to be
used for a long period (>1 year) as the transmitters draw a tiny residual current even when off to
maintain the programmed settings. Also, since batteries installed for a long time can sometimes
corrode and/or leak, causing damage, it is generally recommend that batteries be removed any-
time the transmitters are not being used.
• When using the UB-1K for instrument use: (Note: Scratchy noises can sometime occurs when
some electric guitars with dirty pots or connections are used with any wireless system. Therefore,
the supplied capacitor provides first order filtering of the RF signal from the cord into the guitar
and eliminates virtually all scratchy noises. Should your equipment still give you scratchy noises,
we suggest these steps to eliminate them:
a. Make sure all guitar volume and tone pots are clean and all contacts are solid-this is
very important.
b. A 47pF capacitor soldered across the pot to ground terminal of the guitar’s volume and
tone pots will provide extra filtering.