


6
11
UB-1K BODYPACK MICROPHONE TRANSMITTER
10. Adjusting the Mute (RF Squelch)
The Mute (RF squelch) (14) controls both the A and B receiver channels. This control ranges from
01 (high sensitive mute level) to 50 (low sensitive mute level). The control should be adjusted up to
the highest reading at which the RF Level Meter (12) and the Diversity Indicator (13) will remain
on while your transmitter is in normal use, up to the maximum operating range anticipated in use.
However, in areas of high RF activity, the mute may need to be adjusted. If the transmitter is off
and the receiver signal and the diversity indicator are flickering or stay on continuously, the mute
should be adjusted higher reading (low sensitive mute level) to stop the flickering. Be careful not to
select too high reading as that will reduce the operating range what is needed. A range walk test will
help in selecting the proper level needed. If the range is not critical, note that a higher reading will
also yield a quieter mute function, which might be desired in certain applications. The mute level is
factory preset at 01 for maximum sensitivity and operating range.
11. Audio Level and Peak LED Indicator
The UWS-1K receiver is equipped with a 5-segment AF LEVEL LED (15) display that lights up
sequentially indicating the level of the audio signal from the transmitter. Occasional flickering of the
top (red) Peak LED on loud inputs to the transmitter is normal. If the Peak LED lights continuously,
decrease the volume to the transmitter or overload distortion may result.
12. Connecting the Audio Output
The UWS-1K audio output is set up for either balanced (fixed level) or unbalanced line (adjustable
level). The output is controlled by the Volume Control (16).
For balanced output with either a handheld mic or lavalier bodypack transmitter, plug an audio
cable with an XLR connector into the Balanced Output socket and plug the other end into your
amplifier or mixing board. For unbalanced output with either a handheld mic or lavalier bodypack
transmitter, plug an audio cable with a 1⁄4” mono plug into the (AUX) line out and plug the other
end into your amplifier or mixing board. For an instrument transmitter system, use the (AUX) output
connects directly to your own system. The system output is approximately +4dB higher than a direct
cord-to-amp connection.
(Note: As when making any connection, make sure the amplifier or mixing board volume is at the
minimum level before plugging in the receiver to avoid possible sound system damage.)
Your UWS-1K is now operational and ready to use. Now that you have completed the above step,
proceed to instructions for the UH-1K or UB-1K transmitter included with your system. (Please note:
Only one transmitter can be used with one UWS-1K receiver. It is not possible too use two transmit-
ters on the same frequency and mix the output of these transmitters into one wireless receiver.)
UWS-1K RECEIVER
For normal use with guitars and bass guitars, the Input Level Control (31) should be set to maxi-
mum for least noise in operation. If using active pickups with greater output or if distortion is heard
not present when using a cord, turn the control down till the audio is distortion free.
(Note: The level should be adjusted on the instrument as when using a hard-wired cord.)
22. Microphone Use (with either a Lavalier or Headworn
Microphone)
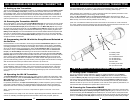
Secure the connection of the LT (headworn or lavalier mic) cable by lining up the slot of the mini
XLR connector and pushing in to lock in.
When ready to play, press the Power/Mute Button (32) once momentarily to unmute the transmit-
ter audio. To use the lavalier mic, attach it at chest level. Do not place it too close to the mouth—a
distance of about six inches usually works best. To use the headworn mic, place it on the head and
adjust the boom so that the mic is about one inch to the side of the front of the mouth. When ready
to use, press the Power/Mute Button (32) once momentarily to unmute the transmitter audio.
For optimum performance, an input level control in provided. Adjust the gain by turning the control
with a small screwdriver. For lavalier mic use, it is recommended that the level be set about 2/3
maximum. For headworn use, it may be advisable to turn the gain down somewhat, depending on
the volume levels expected. In either application, experiment and set for maximum possible gain
without audible distortion on the high level peaks.
[Note: The RF Level Meter (12) and the Diversity Indicator (13) on the receiver are “ON” in
normal use with the audio “ON” (not muted). When the transmitter is “ON” but muted, the RF Level
Meter will stay “ON” but the Diversity Indicator wil be “OFF”.]
(Note: Tuning down the gain too much can compromise the signal-to-noise and is not
recommended.)
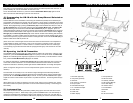
29. Battery lid
30. Battery holder
31. Input level control
32. Power/Mute button
33. Battery level LED
34. IR LED indicator/mute LED
35. Mini XLR inputs
36. IR LED sensor
37. Wire antenna
38. Belt clip
31
29
30
38
35
36
34
33
32
37