


5
GB
11. SPEAKERS
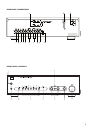
Speaker terminals for speakers with an impedance of 4 ohms or
more. Connect the right speaker to the terminals market ‘R +’ and
‘R-’ ensuring that the ‘R+’ is connected to the ‘+’ terminal on your
loudspeaker and the ‘R-’ is connected to the loudspeaker’s ‘-’
terminal. Connect the terminals marked ‘L+’ and ‘L-’ to the left
speaker in the same way.
Always use heavy duty (16 gauge; 1.5mm, or thicker) stranded
wire to connect loudspeakers to your NAD C340.
The high-current binding post terminals can be used as a screw
terminal for cables terminating in spade or pin sockets or for
cables with bare wire ends.
BARE WIRES AND PIN CONNECTORS
Bare wires and pin sockets should be inserted into the hole in the
shaft of the terminal. Unscrew the speaker terminal’s plastic
bushing until the hole in the screw shaft is revealed. Insert the pin
or bare cable end into the hole and secure the cable by tightening
down the terminal’s bushing.
Ensure bare wire from the speaker cables does not touch the back
panel or another socket. Ensure that there is only 1/2” (1cm) of
bare cable or pin and no loose strands of speakers wire.
12. AC LINE CORD
Plug the AC power cord into a live AC wall socket. Make sure all
connections have been made before connecting to mains.
13. NAD LINK IN, OUT
The NAD-Link connector is used to pass commands from other
units fitted with NAD-Link connectors. This allows centralised
control of a complete system, and also allows some of the basic
functions of other NAD components (such as a tuner, CD player or
cassette-deck) also equipped with NAD-Link to be controlled with
the amplifier’s remote control. To function with such other units,
connect the C340’s NAD-Link Out to the NAD-Link In on the other
unit. NAD-Link connectors can be daisy-chained, IN to OUT, so
that a whole system can be controlled from the remote control
facilities of one unit.
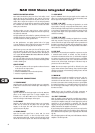
FRONT PANEL CONTROLS
1. POWER
Pressing the POWER switch turns the unit On. The LED for the last
selected input will light up. Pressing the POWER switch again will
turn the amplifier Off.
NOTE: The remote control handset supplied with the C340 is of a
universal NAD type, designed to operate several NAD models.
Some buttons on this handset are inoperative as the functions
aren’t supported by the C340. The Green On/Off button on the
remote control handset is inoperative in the case of the C340.
2. HEADPHONE SOCKET
A 1/4” stereo jack socket is supplied for headphone listening and
will work with conventional headphones of any impedance.
Inserting a headphone jack into this socket automatically switches
off the loudspeakers. The volume, tone and balance controls are
operative for headphone listening. Use a suitable adapter to
connect headphones with other types of sockets, such as 3.5mm
stereo ‘personal stereo’ jack plugs.
NOTE: Make certain that the volume control is turned to
minimum (fully anti-clockwise) before connecting or
disconnecting headphones. Listening at high levels can damage
your hearing.
3. INFRA-RED REMOTE CONTROL COMMAND
RECEIVER
The infrared sensor, located behind this circular window, receives
commands from the remote control. There must be a clear line-
of-sight path from the remote control to this window; if that path
is obstructed, the remote control may not work.
NOTE: Direct sunlight or very bright ambient lighting may affect
the operating range and angle for the remote control handset.
4. INPUT SELECTORS
These buttons select the active input to the NAD C340 and the
signal sent to the loudspeakers, the Tape outputs and the PRE OUT
sockets. The buttons on the remote control handset duplicate
these buttons, with the exception of the tuner input; see below.
Green LEDs just above each button will indicate which input is
currently selected.
DISC Selects a line-level source connected to the DISC sockets as
the active input.
CD Selects the CD (or other line-level source) connected to the
CD sockets, as the active input.
VIDEO Selects the VCR (or stereo TV/Satellite/Cable receiver)
connected to the VIDEO sockets, as the active input.
AUX Selects a line-level source connected to the AUX sockets, as
the active input.
TUNER Selects the tuner (or other line-level source) connected
to the Tuner sockets, as the active input. The remote control
handset has separate buttons for AM and FM; pressing either one
will select the C340’s tuner input.
TAPE 2 Monitor Selects the output from a tape recorder when
playing back tapes or monitoring recordings being made through
the Tape 2 sockets. Press the Tape 2 button once to select it and
again to return to the normal input selection.
Tape 2 is a tape Monitor function which does not override the
current input selection. For example, if the CD is the active input
when TAPE 2 is selected, then the CD signal will continue to be
selected and sent to both the TAPE 1, and TAPE 2 OUTPUT sockets,
but it is the sound from recorder connected to Tape 2 that will be
heard on the loudspeakers. Apart from the amber LED to indicate
Tape 2 is engaged, the green LED for the active input will also stay lit.
TAPE 1 Selects Tape 1 as the active input.
NOTE: The remote control handset with the C340 supplied is of a
universal NAD type, designed to operate several NAD models.
Some buttons on this handset are inoperative as the functions
aren’t supported by the C340. The Video 2 and Video 3 input
selector buttons on the remote control handset are inoperative in
the case of the C340.
5. SOFT CLIPPING INDCATOR
The green Soft Clipping LED shows that the Soft Clipping mode is
engaged. Refer also to chapter “Rear Panel Connections”, section
10; “Soft Clipping” for more information.
6. BASS & TREBLE CONTROLS
The NAD C340 is fitted with BASS and TREBLE tone controls to
adjust the tonal balance of your system.
The 12 o’clock position is ‘flat’ with no boost or cut, and an indent
indicates this position. Rotate the control clockwise to increase
the amount of Bass or Treble. Rotate the control anti-clockwise to
decrease the amount of Bass or Treble. The Tone controls do not
affect recordings made using the Tape outputs but will affect the
signal going to the Pre-amp output (Pre Out).