


✔ DO ensure that all instructions have been followed before power is applied to
system. The installation shall be carried out in accordance with all applicable
installation rules.
✔ DO use only M&S systems brand cable (except for Cat-5 & RG-6) as called
out in these instructions. The cable is designed and constructed with electrical
specifi cations necessary for proper audio performance.
✔ DO use only a dry cloth to clean the exterior plastics on the dmc1 Master Station
and Room Stations. DO NOT use liquid or aerosols.
✔ DO make gradual bends of the cable where necessary -- no sharper than 1” radius.
✔ DO dress the cables neatly with cable ties or Velcro™ wraps. Use loose or
moderate pressure.
✔ DO use cable-pulling lubricant only for cable runs that may otherwise require great
force to install. When cable lubricant is used, read the instructions to be sure it is
compatible with the cable jacket material (PVC or FEP).
✔ DO avoid stressing cable conductors, limit pulling tension to 25 pounds or less
as specifi ed by EIA/TIA-568A standard. Pull cables gradually and with constant
tension, taking care not to crush or pinch bundles.
✔ DO use grommets to protect the cable where passing through metal studs or
anything that can possibly damage them.
✔ DO test every installed cable run with a cable tester. “Toning” alone is not acceptable.
✔ DO label every termination point. Use a unique identifi er for each cable run. It will
make moves, adds, changes, and troubleshooting easier.
✔ DO support horizontal cable bundles using board supports, J-hooks, or cable trays.
✔ DO have signal cables cross at right angles to power cables to minimize induced
interference.
✔ DO always obey all local and national fi re and building codes. Be sure to “fi restop”
all cables that penetrate a fi rewall. Use plenum-rated cable where mandated.
✔ DO follow the grounding and bonding requirements established by Electrical Code
TIA standard 607, and equipment manufacturer’s specifi cations.
✔ DO NOT locate the dmc1 Master Station or Room Stations in an exterior wall.
✔ DO NOT locate the dmc1 Master Station or Room Stations in any wall cavity with
any other electrical wiring in the cavity.
✔ DO NOT locate Patio Stations in places with direct exposure to sun and weather or
in locations that receive direct water spray.
✔ DO NOT attach non line-level audio devices or non M&S authorized equipment to
the system.
✔ DO NOT power up Master Station until all speakers and stations are connected.
✔ DO NOT splice or repair cables damaged during wire pulling, install a new cable.
✔ DO NOT coil or bundle the cables. This can cause electronic feedback.
✔ DO NOT over-tighten the screws for the volume controls, speakers, or the intercom
Master Station to prevent cracking.
✔ DO NOT install any station or speaker cables inside the 120 VAC transformer
enclosure.
✔ DO NOT tie cables to electrical conduits or lay cables on electrical fi xtures. Keep
cables at least 16” away from fl uorescent lights, HID light fi xtures, or dimmers.
✔ DO NOT allow the cable to be sharply bent or kinked at any time.
✔ DO NOT install cables “taught” in the ceiling or elsewhere. A good installation
should have cables loose, but never sagging.
✔ DO NOT run signal cables parallel to power cables without adequate separation to
minimize induced interference.
✔ DO NOT exert more than 25 pounds of tension on 4-pair cables.
✔ DO NOT step on Cat-5 cable during installation.
✔ DO NOT overtighten the cable ties, apply cable ties loosely, with random spacing.
✔ DO NOT untwist the wire pairs in Cat-5 cable more than 1/2” to avoid crosstalk.
IMPORTANT DO’S & DON’TS
● A licensed electrician must run a 120 VAC line from A DEDICATED 15-AMP
BREAKER to the dmc1 (and dmc1CD or dmc1MM, if equipped) transformer.
● Use Cat-5 wire for all dmc1 wire runs excluding Door Station wire runs. For
Door Stations, use the M&S Systems brand MS4DCXSC wire that is included
with the dmc1H or dmc1HC wall housing kits.
● Individual wire runs should not exceed 350 feet from any single room or Door
Station to the dmc1 Master Station or 1000 feet total for the entire system.
● Label all wire runs. Connecting the wires to the dmc1 Master Station, Room
Station, or Door Station incorrectly may result in system damage.
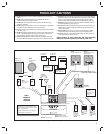
● Run a single cable from the Master Station unit location to each Room Station
and Door Station in a “home run” fashion. Do not loop cable from one Room
Station to another.
● DO NOT STAPLE CABLES. Staples cause shorts.
● DO NOT SPLICE CABLES. Splices are unreliable and defeat the signal
isolation properties of the cable.
● KEEP CABLES AT LEAST 18 INCHES FROM FLUORESCENT LIGHT
FIXTURES, DIMER CONTROLS, AND ALL OTHER WIRING. This includes
AC wiring, security cable, and other control wires. These can cause a “hum” or
“buzzing” sound.
● Keep cables away from objects such as heating and air conditioning ducts,
metal construction plates, and anything else with sharp edges that can damage
the cables.
Careful consideration should be used when determining the location
of the Room Stations. DO NOT install these devices in the following
locations:
✔ DO NOT install Room Stations near air return ducts.
✔ DO NOT install Room Stations in exterior walls. Insulation materials will change
speaker range and effi ciency. Temperature changes in the wall will reduce
speaker life.
✔ DO NOT install Room Stations in saunas. They will not withstand the extreme
heat and moisture.
✔ DO NOT install Room Stations underneath cabinets or over counter tops.
✔ DO NOT install Room Stations in stud cavities with other wiring or appliances.
✔ DO NOT install Room Stations within 10 feet of other Room Stations or the
dmc1 Master Station unit. This will cause acoustical feedback.
✔ DO NOT install Room Stations in stud cavities with other Room Stations or the
dmc1 Master Station unit. This will cause acoustical feedback.
✔ DO NOT install Room Stations facing each other Room Stations or the dmc1
Master Station unit. This will cause acoustical feedback.
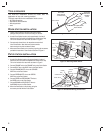
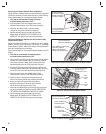
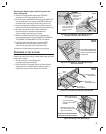
Be sure that all Room Station mounting rings are level and oriented
as shown in these instructions.
Failure to adhere to these instructions can cause equipment
malfunction and void any warranty covered by Linear LLC.
WIRING CAUTIONS ROOM STATION CAUTIONS
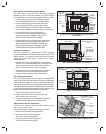
TABLE OF CONTENTS
Tools Required . . . . . . . . . . . . . . . . . . . . . . . . . . . . . . . . 2
Room Station Installation . . . . . . . . . . . . . . . . . . . . . . . . 2
Patio Station installation . . . . . . . . . . . . . . . . . . . . . . . . 2
Door Station Installatoin . . . . . . . . . . . . . . . . . . . . . . . . 3
Satellite Volume Controls . . . . . . . . . . . . . . . . . . . . . . . . 3
External Music Source . . . . . . . . . . . . . . . . . . . . . . . . . 4
Intercom Master Station Installation . . . . . . . . . . . . . . . 4
Powering Up the System . . . . . . . . . . . . . . . . . . . . . . . . 9
2-Year Limited Warranty . . . . . . . . . . . . . . . Back Cover