


4
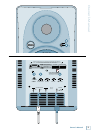
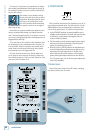
HR84 MK
HR824 MK2
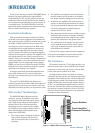
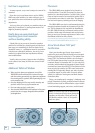
The Cabinet...
The cabinet is made of MDF with a high-gloss piano-
black finish. Internal bracing increases the strength and
rigidity (stiffness) of the box. An open-cell adiabatic
foam material fills the inside of the box to absorb inter-
nal reflections and dampen standing waves. Mounting
hardware is installed on the bottom of the cabinet that
fits the 60.0 WB OmniMount wall-mount bracket (see
“Placement” on page 6 for more info).
FR Series Power Ampliers...
What better way to power the loudspeakers than with
our acclaimed FR Series “Fast Recovery” power amplifi-
ers. Our Fast Recovery design uses low negative feed-
back, yet allows the amplifiers to maintain low distor-
tion and stability even when driven into clipping.
The low-frequency amplifier produces up to 150 watts
continuous (350 watts peak) before clipping, while
the high-frequency amplifier produces up to 100 watts
continuous (210 watts peak).
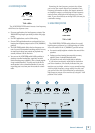
QUICK START
We realize that you can’t wait to hook
up your new Mackie HR824 MK2 High
Resolution Studio Monitors and try
them out. Nevertheless, please take
the time to read this page NOW, and
the rest can wait until you’re good and ready.
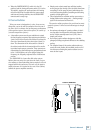
Each of the HR824 MK2 cabinets has its own built-
in power amplifiers. That’s right, two amplifiers per
speaker cabinet; one for the high-frequency tweeter
and one for the low-frequency woofer. You should turn
the INPUT SENSITIVITY [2] control on the back of the
cabinet down (fully counterclockwise) before turning
on the Studio Monitors for the first time. Also be sure
to set the power switch [9] on the front panel to its
standby position (out). This will prevent you from acci-
dentally connecting a hot signal source to the monitors
and getting a rude surprise.
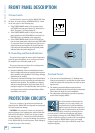
There are a number of other settings you can make
on the back of the HR824 MK2, and you can look at the
graphic instructions relating to each of them on the
back of the cabinet (or wait until you read about them
later on in this manual so you really know what they
do). For now, just leave them at the factory default
settings (ACOUSTIC SPACE = WHOLE; LOW FREQ =
49Hz; HIGH FREQ = 0), except for the POWER MODE
[6] switch. Be sure it is set to the STANDBY position.
1. Connect the line-level monitor signal from your mixer,
preamp, or other signal source to the SIGNAL INPUT
[1] jack on the HR824 MK2 Studio Monitor (1⁄4-inch
PHONE, XLR, or RCA).
2. Connect the supplied AC power cord to the IEC socket
[7] on the back of the monitor. Plug the other end into
an AC outlet properly configured with the correct volt-
age for your particular model.
3. Set the POWER MODE [6] switch on the rear panel to
the ON position. With the front panel power switch [9]
out, the power amplifier is in Standby mode.
4. Start your signal source (tape deck, CD, DAW, or
whatever), but leave the master volume control on your
mixer or preamp down.
5. Push in the power switch [9] on the front of the HR824
MK2. The power ring [10] around the switch will illumi-
nate.
6. Slowly turn up the INPUT SENSITIVITY [2] control on
the back of the monitor to its fully clockwise position
(NORMAL).
7. Adjust the master volume on your mixer to a comfort
-
ably loud listening level. Enjoy the silky smooth highs
and authoritative, commanding lows of the HR824 MK2.
Then read the rest of this manual.
AN EXTREMELY IMPORTANT NOTE
ON HR824 MK2 BASS RESPONSE
AND YOUR CONTROL ROOM.
Your new HR824 MK2s achieve their
best bass response in a room that’s
optimized for bass reproduction. A
lot of factors can conspire to thwart
the HR824 MK2s’ extended low
frequency — including room shape, room volume and
acoustical treatment.
This is not a cop-out or an apology. It’s plain old
physics in action. Luckily we’ve armed you with some
compensating controls that you can use to optimize the
frequency response of the speakers in your particular
room. Consider the following:
The ACOUSTIC SPACE switch
must be set correctly.
When you put your HR824 MK2s in a corner or up
against walls, their bass characteristics change. Adjust
the ACOUSTIC SPACE [3] switch setting accordingly to
avoid muddy or exaggerated low frequency response.